Before you go further, I recommend seriously considering
Pascoli's floor rail kit and not the standard Rally kit.
I recently was told by a reputable shop that Pascoli is now outsourcing his products and the quality of them is a lot different that it was four or five years ago. I do not have first hand knowledge of this, but it makes me slower to want to buy Pascoli immediately.
If I replaced my
legshield trim with
Pascoli's ($67) and my floor rail kit ($170) my bike would be more period correct -- totaling $237 plus shipping. I spent under $70 with shipping for my set up, which other SS180 owners have used. So for a grand total of $307 plus shipping we can have it correct (with our $70 already invested). The question is would we see a return on this investment if we sold the bike. Is it like a new kitchen or bathroom where your guaranteed a return? Is it important enough to the owner Lisa to have it period correct?
This is a moot point considering we don't have $300 to spend right now. We have some huge expenses coming and it will be a long while before the toy penny bank starts filling up. We will roll with what we have and some time down the road I will fix the seat and replace these items.This blog post will comprehensively cover one way to install floor rails. After five or more hours of phone calls, web searching, emails, and two web forums I decided to pop rivet everything, but the end caps on the floor rail kit. The end caps will be hand
peened into a mushroom and then waffled to look manufacturer stock.
Day one:
After three hours work we had one outer rail pop riveted on and all three left side floor rails shaped and the holes cleaned out and lined up. We spent 45 minutes planning and discussing our plan of attack. We learned a lot and the rest should go much faster.
I will add to this entry until it is complete. Please re-visit as it is incomplete in this state.

In retrospect, I wish I bought the $170
Pascoli VSC floor rail kit instead of the $47 Rally kit. We'll get into that later. Pictured above is the Rally kit made by Olympia (Italian).

Here you can see the original rails beside my brand new ones. A rough measurement showed them to be very close in length and shape. The Olympia kit is probably over an inch shorter -- at least on the outer rails. I have heard that
CIF brand is longer and would be better to use, but I do not have first hand knowledge of this.

The end caps of the Olympia kit are on the right and left is stock.

At a closer look you can see the mold the new end caps came from left a knob. I will use
Wetodry sandpaper to sand that off. I bought a variety pack and will hit will 2000 grit wet paper. Then I will make sure those end caps face inward so no one sees that I sanded them.

Ted owned a pop rivet gun and last week we determined the pop rivet size required. I will post later. If you click to enlarge the photo you can read the sizes he bought. We used the larger.
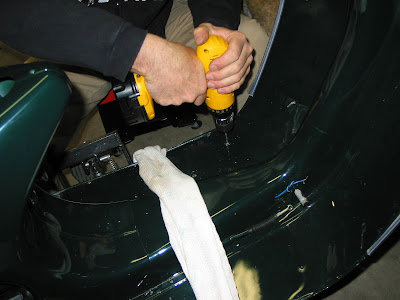
We cleaned out the paint from the holes in the frame to make sure they would accept the rivets.

Run a small pilot through all holes and then a larger drill bit for all holes, but NOT the end caps, because the rivet is smaller.

Do not wipe the drill shavings off with a cloth. You'll kill your paint. Blow it off.

Next we installed a very thick fibered paper that my wife bought when we painted out house. This stuff is tough! You could drag a wrench across it and your paint would be safe. Heck you could spill water on it and your scoot would stay dry. With a nail punch we marked the holes.

Then we shaped all three of the floor rails for the left side starting with the inner ones and ending with the outer pictured above. The first two were very easy.

The outer rail was a little tricky. We wanted to make sure that the end cap holes lined up too. We used a camping propane bottle in a vice and put a sock over the rail and then gently rolled in a curved shape.

We then mounted a wall hook to a piece of wood for leverage and put the outer rail back on the frame and rocked the hook in the rail to snug it up perfectly. It worked well without creasing the rail.

After that we enlarged the rail holes to accept the pop rivets. Do not enlarge the end cap holes. That is not necessary.

File the holes clean. It is important that the base of the floor rail is clean and clear. The inside needs to be clean too so you minimize the size of knob on the pop rivet. The rubber still needs to fit over top of it.

We bolted the end caps on to hold the rail in place. We taped the washer to protect the paint.

With the drill again we made sure all the holes were aligned. We moved the rail as far forward as possible so the end cap would rest beside for the
legshield trim.

Next we pop riveted the holes, but we did NOT tighten them all the way to cut free. We applied pressure to the floor rail as we pop riveted. Be very careful, because there is a danger you can crease and destroy your floor rails here. Do NOT over tighten. With the outer rail we were successful. Also, make sure you tuck the rivet head into the beading along the outside of the frame underneath so it lays flush when you compress the rivet.
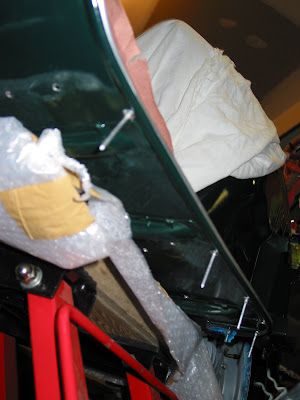
This is what the pop rivets look like before being cut. The flush side is underneath. I opted not to use washers for a cleaner look and it seems the install went well.

We checked everything and then tightened them all down one click and crack no more pop rivet, just a rivet.

The Rally kit is not a perfect match, but it's close. The body work was not flush and therefore we needed to move the rail a hair here and a hair there. We were very gently and the soft metal is very responsive.

This is how the outer rail looks installed.

My biggest disappointment is that the end cap is not further up. I honestly expected it to be further up -- not perfect but better. I was warned these rails were thinner and shorter, but I didn't expect it to look this bad. The weird thing is that the Rally rails line up with the holes in the frame and the end caps holes obviously line with the rails; therefore I wonder if the P Series
legshield trim is why it is coming up short. I need to look into that.
I will go with the
Pascoli kit in the future, but for now I want to find an NOS
legshield trim. Once I have the right trim I'll redo the floor rails. Look at
Hiro's pictures (scroll down) and you'll see what I mean about how terribly my rails look to stock ones. I am upset about this, but too tired to go BBS on myself at the moment. CRAP! My wife, the owner and rider of this SS, is even considering if going with the correct floor rail kit is best. I am with her, but don't want to throw one on if the
legshield trim is too short anyways.
Of course, the good news is this is stuff that can be changed later if needed, but will function okay in the interim. I worry the bike is turning into an Ugly Betty with these two items being so visible and off. The bike is SO close to 100% original, but these items lower it for me. I guess it will be up to Lisa, my wife, to make the final call.
I don't know if I am going to invest $40+ in
Pascoli VSC floor rail rubber if I may just replace the hole kit later on and if the Rally rails are shorter I will NOT be able to use the
VSC rubber again, because it will be cut short.
Doesn't it suck that I had to have it fully installed to see how bad it looked. I can't return it now and I am unsure if I will just quit and order
Pascoli or if I will install these and hunt for NOS and when I find hope to buy for under $300 for the
legshield beading and the floor rail. We'll have to see. I am researching that right now.

The end caps will be hand
peened. Lucky for me Ted has experience. His resume is pretty extensive for working on cars and motorcycles. His training came in the late 60s and 70s. If you ever research body work you'll most likely be steered to a 1970
vo-tech manual on "moving metal." During those times it was still an art, not just replace a fiberglass part like today. Pictured above is Ted and the aluminum bowl he hand
peened from a plat piece of metal with a sand back for his mom in 1968.
--------- Day 2 ----------
This process is moving so much slower than I expected. The work can be pretty frustrating, because of the required angles for the floor rails.
We spent another solid 4 plus hours (with two people working) and all that was done was two more floor rails were added (inner ones) and I sanded and polished all of the end caps. So half of the job was complete.

For polishing, I used a file and file down the knob (poor casting quality) until it was almost flush. Then I used 2000 grit wetodry sand paper and ONLY sanded the area I filed so as not to screw the polish up on the rest of the end cap. Then I polished it with Mother's. It cleaned up nice. When I install I will hide the blemished sides facing the bike so people won't see it; though it's not noticable unless you look for it.
-------- Day 3 ---------
On the third day we repeated all of the steps described above on the right floor rails. The holes lined up a little better between the rails and frame.
We made sure line up all the end caps with the rails before laying them down.
Make sure when you drill out the frame holes that you drill from bottom up, because the drill bit will tear the paint and that can be hidden beneath a rail very easily, but not as easily beneath a rivet. Ted thought it wouldn't be an issue, but it was for the most visible holes (the front end caps) on this side and now we need to make sure that the mushroom rivet head will cover it -- it should.
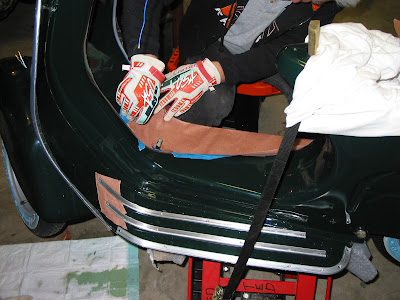
Again we used the ultra thick paper to protect the paint from the rails.
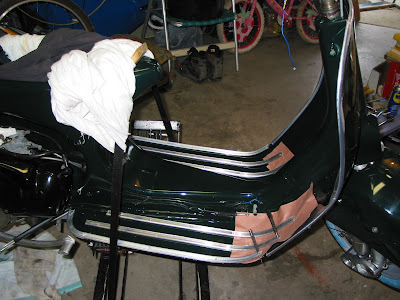
It felt good to see both rails in place.

With a heavy anchor and a punch Ted and I flattened one of the pop rivet heads in the rail so we could run the rubber through smoothly. The aluminum pop rivets give way easily.

The hardest rail to line up is the outer. We had use a rubber mallet on the back of the outer rail on this side to get it to line up in the grove correctly; fortunately this metal is super soft and doesn't take much at all.
Make sure that the body is going to line up with the rail before paint. I'd give the body shop person the bike with the rails bolted on personally so he/she could see how it should line up. I have tiny gaps that I need to hide by moving the floor rail metal very slightly.
Here's what we have left:
1) Flatten the pop rivet heads so the rubber will fit properly
2) Install rubber
3) Install the end caps / rivets
4) Waffle the end cap rivets
We're hunting for the correct rivet punches and waffle.
For newbies, working in a pair slowly and cautiously give yourself 10 hours to do the entire job well.
-------- Day 4 ---------
I spent $1.69 at Harbor Freight Tools for these punches and decided to use these to create my rivet punches.
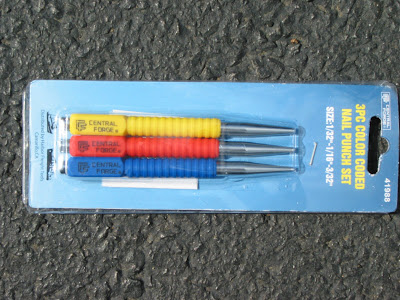
When all was said and done it looked like this.

First we cut the tip off the punch and then using a Dremel and a concave drill bit we shaped the tip.

We added oil as we drilled it out, which helped a lot.

Then we used a softer Dremel tip to "cone" it out.

Once done we used Emery paper to smooth it out. The finish product was pretty good considering we don't have shop lathe, which would have made this process a lot faster and easier.

We also used screws, washers (with painters tape), and nuts to bolt on the end caps so in the hopes that the floor rails would retain a memory of shape.
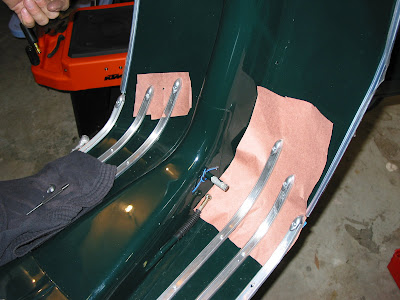
We very quickly learned that the majority of the holes of the end caps do not line up with the floor rails and frame holes, which means the rivets or screws are angled. This upset us. It was a major paint in the butt to bolt them down and most of the endcaps did not fit, they are cockeyed.
Before screwing the endcaps on I carefully selected each endcap for each specific rail and numbered them with a Sharpie on the rail and endcap so as not to mix them up. My goal was to hide the area where I filed and sanded the endcap mold down.
--------- Day 5 ---------
This day sucked. It was a 7 hour day and we have nothing to show for it other than a few tools. Hand peening the rivets went terrible.
We used a bolt to create the ancho that will rest on top of the rivet while it is hit from the bottom. We created 2-3 of these concave punches in all.
First we use a pointed punch to mark the center of it.

Then we used a drill to concave the tip.

Next we decided to make the waffle. Using another Harbor Freight punch from my packet we hack-sawed it so the diameter was as big as possible. We then hack-sawed three cuts in it in each direction being careful to also angle the saw so as to create the teeth of the waffle.

We cleaned the waffle up with the Dremel.

But we found that best thing to use was an angled file.

I recommend using the file to create the groove instead of the hack-saw or Dremel.

I am not happy with how sharp the teeth are on the waffle. I need to re-do it.
We then spent hours working on hand peening the rivets. We put the rivets through the end caps and then cut the excess at 1/4 inch. It leaves a little mohawk shape. Then we used the concave punch, but the rivet kept bending and folding over. It was terrible. We used a concave anchor on top of the rivet to protect the the rivet. We use a rubber with adhesive -- we cut a hole in it -- to protect the paint. It worked, but made it too hard to see so we used painter's tape. We tried a couple times and ended up with the punch eating into the paint. CRAP! We started to install the rear most inner end cap, so it is the least likely to be seen. We laid the bike at an angle -- resting the motor on a block of wood.
We drilled out the rivets after being so bummed with the outcome of the rivet. Check out the May 3rd post on how to properly ball peen rivets. I found it to be very helpful.
Feeling frustrated and defeated we quit. I called Mic at Scooter Shop for advice. He told me two bits of advice: (1) we have too much length on our rivets and need to cut them shorter and (2) use a ball peen hammer to steer the rivet as it is hammered down. The stock rivets from the manufacturer are not perfect looking either. They are bent angles to and somewhat folded over itself, like a compressed slinky that slowly folds into a mushroom. Then it is waffled flat.
We'll try again. We have at least 20 hours invested in the floor rail kit so far and it is a major pain in the butt, but we won't quit until we get it right.
The only problem is my painter wants the bike ASAP to do the touch up because I move back West with the bike on June 9th.
-------- More to follow ---------


