We've all heard the nightmares of "Asian Restorations." Come to think of it I only know ONE person who has a nice and safe Asian restoration.
Although, I must be honest . . . I have family in Vietnam (my wife's family) and I would love to go over there with some money and send her uncle (a local) to pick up an old TV175 S.3 I scouted out and yank the engine and keep the body, etc. (seeing as I have a spare TV motor) and I could make my wife a TV too.
Anyways, back to the point at hand . . . another SS180 restoration blog is alive and well thanx to Scooterchick Sam. A-freakin'men! to see an Asian scooter being saved, especially a VSC.
Please check out her SS180 and the issues she has to overcome. Click on Scooterissmo.
Thank you for the support and kind words Sam. I need the encouragement too.
Please leave comments for Sam and push her on. Lurking is cool, but we bloggers need feedback too.
Showing posts with label restoration. Show all posts
Showing posts with label restoration. Show all posts
Friday, 4 July 2008

Thursday, 3 July 2008
Restoration 101 (it's all about the process)
I’m not going play it like I am an experienced restorer, because I am not. I don’t know dung compared to many. But I do know a thing or two about mistakes to avoid and “process”. Process is key in a successful restoration. In this post, I will tell you the process I wish I had taken. Please keep in mind that this is written for a newbie restorer, but I really hope that experienced restorers will chime in with comment.
Step 1:
You bought a beat up scoot and believe it is stock. Take a hundred pictures of all the details on the bike. You need to determine if it is worth restoring or it a mechanical rebuild is more appropriate. More often than not, a mechanical rebuild is the answer.
Step 2:
Research the hell out of your bike. Learn every detail you can about it. Collect color pictures, etc. Hang them up in your garage. Download the parts manual for free from Scooterhelp.com. Study it. Buy a Haynes manual. Study it. Keep this information in a well-organized binder or Blog it, like I did.
Step 3:
Assuming you are doing a full restoration . . . open up your parts manual and make photocopies of all of the diagram pages. Disassemble the bike according to the diagrams. First photograph the section you are taking apart each and every step of the way. Download these photos and put them in a folder on your computer that is named exactly the same as the diagram page. Then put the parts into a huge Ziploc bag with the extra copy of the parts diagram. With a Sharpie write the number of the parts diagram page on the outside of the Ziploc. Repeat until the entire bike is disassembled. Put all of the parts in huge Rubbermaid bins in numeric order. This process will save you when you create your parts list and when you put your bike back together.
Step 4:
The next is to create your parts list. Start with the first Ziploc bag of parts and determine if anything is damaged. Write the parts that you need on the diagram in the bag. Put together a spreadsheet of parts needed by diagram – this will help the scooter shop find you the correct part, because they use parts books too. Furthermore, make sure to keep all the original parts in the bag and do not remove them. When you get new parts that are not NOS (new old stock) you will want to compare them side-by-side and take detailed pictures of any differences. These photos will help the shop when you need to exchange parts and make sure you get the right parts.
Step 5:
Order your floor rail kit and all chrome accent pieces now if your stock parts are not usable. Once your bike is stripped down research your model and find out all the parts on the bike that will need to be stripped of paint, bodywork done, and then repainted. Count each item and check it off. Don’t strip by hand if you don’t need to. For all threaded part and items/areas you do not want medium blasted cover it in fiberglass tape to protect it and instruct the blaster to go easy around those parts.
While your bike is off at the medium blasters go buy PPG’s cleaner and conditioner for bare metal. This will prevent rust and allow you to work on your frame parts before primer. When you pick up your bike inspect it closely with cotton gloves. Keep your oily hand OFF IT. Rush it home and treat it with PPG. If you store in a dry place you can touch and handle it for 12 months before treating again or painting.
Step 6:
If you are going to have your nuts/bolts plated. Send those out now.
You should also begin cleaning your parts at this point. An inexpensive way is to fill up a 5-gallon bucket with gasoline. Buy the little copper and plastic scrub brushes from Harbor Freight when they are on sale for 51 cents for 3 brushes. Go outside to clean your parts. Run a fan so you are NOT breathing in the vapors. Don't smoke near by. Be safe and smart. You can soak the parts a little if you need to and build a mesh screen to dip or soak the parts in the bucket. Wear nitrile gloves to protect yourself. It may be best for you clean one diagram bag at a time so as not to mix parts up.
Do or have your bodywork done. Identified all holes that must be filled. This is where all your pictures come in to play. Once that is done use nuts/bolts to install your floor rail kit (minus the rubber) and leave it there as long as your can – a month or what have you. This will result in the metal remembering your floor of your scoot better. Also put on all chrome accent pieces temporarily. Does everything line up 100% perfectly? If not, right now is your last chance to fix it. Work with your body shop on this. You must be there and talking with them to inspect it is being done right. Do NOT rely on anyone to just “get it done correctly.” Invest yourself and your time too. Once that’s go ahead and have it sprayed.
Step 7:
While all this is happening you can be rebuilding your engine (and suspension) and you should also place your HUGE order for all of your parts. So they arrive just before you pick up your body of your scoot. Double-check all of your parts against the original ones to ensure they are correct. Some will not be. Put the new parts in the appropriate bags / diagrams and cross out that you have replaced them from on the diagram where you wrote you needed the part. It’s crazy how many parts did not make it to you. You will need to hunt those down now and order those.
Step 8:
Once you have the body parts back, make a super soft protective bed for them. Put your scooter on your workbench and lay it its side wrapped up in a blanket. Use nitrate or cotton gloves so you don’t leave oily hand all over the new paint. Now install:
- all the cables
- wire harness
- floor rail kit
- kick stand
- run everything that goes beneath the gas tank
The reason you install these things without the engine in and while the bike lies on its side is because it gives you easier access and hand ability of the bike. Trust me on this.
Step 9:
Now you can put the bike upright and install the engine and front suspension. Tape everything off with painters tape to protect metal on metal connections. After the tires are on stand the bike on its own two feet using the kick stand.
Step 10:
Go ahead and finish the bike up from here. As you empty each bag of parts use your digital picture file that aligns with it and put it back together just like you took it apart. If the red wire goes behind the blue wire when you took it apart then that is how you need to put it back together. Use your pictures – that’s why you took them. There is no need to spend an hour trying to figure something out when it only takes :30 seconds to take a pictures and :60 seconds to find and open the picture. Trust me there is a better way to spend those 58 minutes and 30 seconds. I wasted too much time!
Step 1:
You bought a beat up scoot and believe it is stock. Take a hundred pictures of all the details on the bike. You need to determine if it is worth restoring or it a mechanical rebuild is more appropriate. More often than not, a mechanical rebuild is the answer.
Step 2:
Research the hell out of your bike. Learn every detail you can about it. Collect color pictures, etc. Hang them up in your garage. Download the parts manual for free from Scooterhelp.com. Study it. Buy a Haynes manual. Study it. Keep this information in a well-organized binder or Blog it, like I did.
Step 3:
Assuming you are doing a full restoration . . . open up your parts manual and make photocopies of all of the diagram pages. Disassemble the bike according to the diagrams. First photograph the section you are taking apart each and every step of the way. Download these photos and put them in a folder on your computer that is named exactly the same as the diagram page. Then put the parts into a huge Ziploc bag with the extra copy of the parts diagram. With a Sharpie write the number of the parts diagram page on the outside of the Ziploc. Repeat until the entire bike is disassembled. Put all of the parts in huge Rubbermaid bins in numeric order. This process will save you when you create your parts list and when you put your bike back together.
Step 4:
The next is to create your parts list. Start with the first Ziploc bag of parts and determine if anything is damaged. Write the parts that you need on the diagram in the bag. Put together a spreadsheet of parts needed by diagram – this will help the scooter shop find you the correct part, because they use parts books too. Furthermore, make sure to keep all the original parts in the bag and do not remove them. When you get new parts that are not NOS (new old stock) you will want to compare them side-by-side and take detailed pictures of any differences. These photos will help the shop when you need to exchange parts and make sure you get the right parts.
Step 5:
Order your floor rail kit and all chrome accent pieces now if your stock parts are not usable. Once your bike is stripped down research your model and find out all the parts on the bike that will need to be stripped of paint, bodywork done, and then repainted. Count each item and check it off. Don’t strip by hand if you don’t need to. For all threaded part and items/areas you do not want medium blasted cover it in fiberglass tape to protect it and instruct the blaster to go easy around those parts.
While your bike is off at the medium blasters go buy PPG’s cleaner and conditioner for bare metal. This will prevent rust and allow you to work on your frame parts before primer. When you pick up your bike inspect it closely with cotton gloves. Keep your oily hand OFF IT. Rush it home and treat it with PPG. If you store in a dry place you can touch and handle it for 12 months before treating again or painting.
Step 6:
If you are going to have your nuts/bolts plated. Send those out now.
You should also begin cleaning your parts at this point. An inexpensive way is to fill up a 5-gallon bucket with gasoline. Buy the little copper and plastic scrub brushes from Harbor Freight when they are on sale for 51 cents for 3 brushes. Go outside to clean your parts. Run a fan so you are NOT breathing in the vapors. Don't smoke near by. Be safe and smart. You can soak the parts a little if you need to and build a mesh screen to dip or soak the parts in the bucket. Wear nitrile gloves to protect yourself. It may be best for you clean one diagram bag at a time so as not to mix parts up.
Do or have your bodywork done. Identified all holes that must be filled. This is where all your pictures come in to play. Once that is done use nuts/bolts to install your floor rail kit (minus the rubber) and leave it there as long as your can – a month or what have you. This will result in the metal remembering your floor of your scoot better. Also put on all chrome accent pieces temporarily. Does everything line up 100% perfectly? If not, right now is your last chance to fix it. Work with your body shop on this. You must be there and talking with them to inspect it is being done right. Do NOT rely on anyone to just “get it done correctly.” Invest yourself and your time too. Once that’s go ahead and have it sprayed.
Step 7:
While all this is happening you can be rebuilding your engine (and suspension) and you should also place your HUGE order for all of your parts. So they arrive just before you pick up your body of your scoot. Double-check all of your parts against the original ones to ensure they are correct. Some will not be. Put the new parts in the appropriate bags / diagrams and cross out that you have replaced them from on the diagram where you wrote you needed the part. It’s crazy how many parts did not make it to you. You will need to hunt those down now and order those.
Step 8:
Once you have the body parts back, make a super soft protective bed for them. Put your scooter on your workbench and lay it its side wrapped up in a blanket. Use nitrate or cotton gloves so you don’t leave oily hand all over the new paint. Now install:
- all the cables
- wire harness
- floor rail kit
- kick stand
- run everything that goes beneath the gas tank
The reason you install these things without the engine in and while the bike lies on its side is because it gives you easier access and hand ability of the bike. Trust me on this.
Step 9:
Now you can put the bike upright and install the engine and front suspension. Tape everything off with painters tape to protect metal on metal connections. After the tires are on stand the bike on its own two feet using the kick stand.
Step 10:
Go ahead and finish the bike up from here. As you empty each bag of parts use your digital picture file that aligns with it and put it back together just like you took it apart. If the red wire goes behind the blue wire when you took it apart then that is how you need to put it back together. Use your pictures – that’s why you took them. There is no need to spend an hour trying to figure something out when it only takes :30 seconds to take a pictures and :60 seconds to find and open the picture. Trust me there is a better way to spend those 58 minutes and 30 seconds. I wasted too much time!
Thursday, 20 March 2008
Reassembly: Progress is made
 Here's a sneak peak with the status of the SS180 reassembly with my buddy Ted above. Ted has done most of the work and has been teaching me a lot along the way. We spent over three hours on it last night and will spend quite a bit more on a weekly basis moving forward.
 It looks really clean and I am beginning to get very excited about the progress being made.
 We're going to be able to add fuel soon and fire it up.
 Without a doubt this is my favorite stage of the restoration, because the countless hours of research and shopping for parts is paying off.
 Cables and electrical are all run. Oil will go into the tranny soon and the gas tank will be installed in the near future.
Sunday, 24 February 2008
Fender Hardware Sizes
I have received a few emails requesting the size of the hardware for the front fender to steering column.
Thanx to Eric W., who provided me with this:
"I just put the fender on the fork friday. The top of the fender is 3
slotted m3 bolts. They are 3/4 inch in length. The two on the side of
the fender are slotted m5 bolts. They are 1/2 inch in length." -- Eric
Correction:
"Yeah, the top bolts are not 3mm. They are 5mm x .80 x 18mm hex head bolts, no markings on the head. Good place for stainless since you can polish off the bolt head markings, and it's a non high stress location." -- Paul
Thanx to Eric W., who provided me with this:
"I just put the fender on the fork friday. The top of the fender is 3
slotted m3 bolts. They are 3/4 inch in length. The two on the side of
the fender are slotted m5 bolts. They are 1/2 inch in length." -- Eric
Correction:
"Yeah, the top bolts are not 3mm. They are 5mm x .80 x 18mm hex head bolts, no markings on the head. Good place for stainless since you can polish off the bolt head markings, and it's a non high stress location." -- Paul
Friday, 22 February 2008
Budget Check-In
To date, here's what's been spent on the SS180 restoration:
$3,734 -- Services and parts
$123 -- Cables, steering column bearings, wire harness, etc.
$12.50 -- Powder coat rear shock spring
$55.92 -- Reassembly parts ordered
$18.00 -- three tire inner tubes from B&B Yamaha in Lancaster, PA.
Roughly, we've spent a total of $3,942.00 so far. This includes the price of the scooter and everything since day one.
I suspect that we are $400, at the highest, away from completion. Therefore, this restoration will come in under $4,500. The number is higher than the original $3200 to $3800 which I thought it would cost.
$3,734 -- Services and parts
$123 -- Cables, steering column bearings, wire harness, etc.
$12.50 -- Powder coat rear shock spring
$55.92 -- Reassembly parts ordered
$18.00 -- three tire inner tubes from B&B Yamaha in Lancaster, PA.
Roughly, we've spent a total of $3,942.00 so far. This includes the price of the scooter and everything since day one.
I suspect that we are $400, at the highest, away from completion. Therefore, this restoration will come in under $4,500. The number is higher than the original $3200 to $3800 which I thought it would cost.
Saturday, 2 February 2008
Hardware Disassembly
Disassembling your bike?
Keep it organized. Visit Scooter Help and download your Vespa's or Lambretta's parts catalog for free and follow the advice below:
"I am not sure how do you organize your nuts and bolts when you take your bike apart. But I, at least, organized the hardware into separate by using parts manual. For example, I only stock the hardware in one storage by one figure describe on it, such as T.1/1 or T.2/1. That makes things super easy when you reassemble a bike. When you need the hardware re-chroming, you need to take photos for each storages using a metric cutting mat. I guess this is what Tom G. taught to me a while back." - Hiro
Thanx Hiro. That is sound advice and all you have to do is follow the picture in the parts manual, ie T.1/1.
Keep it organized. Visit Scooter Help and download your Vespa's or Lambretta's parts catalog for free and follow the advice below:
"I am not sure how do you organize your nuts and bolts when you take your bike apart. But I, at least, organized the hardware into separate by using parts manual. For example, I only stock the hardware in one storage by one figure describe on it, such as T.1/1 or T.2/1. That makes things super easy when you reassemble a bike. When you need the hardware re-chroming, you need to take photos for each storages using a metric cutting mat. I guess this is what Tom G. taught to me a while back." - Hiro
Thanx Hiro. That is sound advice and all you have to do is follow the picture in the parts manual, ie T.1/1.
Tuesday, 29 January 2008
Reassembly Update #3
Until the end of Feburuary 2008, my plate is so full that I can't see over the top of it; therefore no work on the Vespa from me.
But I did tell my buddy, Ted W., who has the scoot at his shop that he can tinker with it, but not to knock himself out. Just have fun, is what I said. Ted has ol'school shop experience that nears at least 2/3 of my lifetime. He does nearly all his own work on all seven "running" motorcycles in his shop. So you can say, I really trust him. He is teaching me a lot!
I just got a total surprise email from him, which reads:
1/29/08
But I did tell my buddy, Ted W., who has the scoot at his shop that he can tinker with it, but not to knock himself out. Just have fun, is what I said. Ted has ol'school shop experience that nears at least 2/3 of my lifetime. He does nearly all his own work on all seven "running" motorcycles in his shop. So you can say, I really trust him. He is teaching me a lot!
I just got a total surprise email from him, which reads:
1/29/08
J-bone,

You know I had that thought when we talked about stainless and the blog
is correct in that they aren't really any stronger.

The # 5 nuts and bolt will suffice, or even one with a higher rating as
long as the size 14mm is correct.

Update:
The tires are mounted on the wheels,
Rear shock is done and ready to install,
Complete Steering stem is in place. Top collar screw is hand tightened
right now. (I still have to locate the fender nuts/bolts)
I will be moving the scooter off of the large platform and putting it on
my m/c lift so that the front and rear suspension hang free and are more
accessible.

I will use the larger platform to lay out the rest of the pieces so we
don't have to keep digging in a box to find things. I also want to make
sure parts a clean before installing them. I am not throwing anything
away for fear of needing a non-obtainable part later on. After we finish
we can decide what to pitch and what to keep.

Maybe we can hook up after school and head for Lowes nut/bolt department
to get what we need. I will get the nut /bolt rating list for us to see.

We are making good progress.
Later dude,

tedster
Wednesday, 23 January 2008
Birth of another scooter restore blog
Keep your eyes on Eric's VBB. He's moving forward. Watch his restoration progress! Cheer him on. Bloggers need compliments and support. It feels like working in a vacuum at times and appreciative readers go a long long way.
Monday, 21 January 2008
VBB Restoration Advice
I received an email asking for potential websites and resources for restoring a VBB -- Vespa Super. Below is the email transaction of what I recommend. Please note that I am far from an expert, but I am always happy to share anything and everything that I have learned in this process.
Eric,
Congrats. Note: Be very careful with all eBay purchases. 90% are crap! It sounds like you may have found yourself a 10%'r. First off, please read my post (I think there may be two) on Things to think about during "Disassembly." If you are new to this process as I am, you will want to get all of your ducks in a row before moving forward at all. Also, this may feel like a big pain in the butt, but consider reading my blog from day one to present, because I too had a SERIOUSLY seized piston and show what it took to get it free (more than PB Blaster) and I also had many other issues, which I am sure you will experience as most restorers do. I promise it's worth the read. Before I restore my 1963 TV175 I am going to reread my entire VSC blog.
Now to answer you questions:
Great overview of restoration -- http://vespavillage.com/
Restoration of a Vespa Super -- http://www.scooterhelp.com/restorations/vbb.html
Maintenance of VBB -- http://web.mit.edu/scz/www/scoot/vbb-repair.shtml
Use Scoothelp.com to download info on your model, specifically the "parts" and "maintenance" manuals. Study those like there will be no tomorrow!
Eric, if you can salvage the original paint by treating rust and bringing back a little of the original luster of paint I suspect that would be a smarter move than repainting. If it's an option. The blog recommends products for this. It will cost at least $1000 to have it professionally painted and the value of the bike will not increase that much, if it were a MKII, VSB or an SS90, it would be a wise investment.
If you plan to do any bodywork or paint yourself, jump onto the forum at www.autbodystore.com, and ask many questions. This will prove better advice than you get on BBS, etc. These guys are hardcore and really know there stuff more than most.
Search the web relentlessly and study every square inch of your bike -- how it the day it left the warehouse.
http://www.youtube.com/watch?v=HFKiLgX5mFY&feature=related
http://uk.youtube.com/watch?v=l_Fjfs9LWRw
Email people that post videos and such on your specific bike and ask away as well.
Be relentless in your documentation of the entire restoration. Blogging forces me to record everything immediately and in great detail. It's a wonderful tool for me and the readers as well. I recommend starting a blog on the process. Walk your readers through your experience, writing it down forces you to process it.
Anything else you need at this time Eric?
Good luck and PLEASE keep me posted.
Jeremy
Eric W. wrote:
I got a 1963 VBB 150 off of eBay (no, not a vietnamese one, one that needs A LOT of work). Within an hour of owning it, I had completely taken it apart and moved all the pieces to the basement to prep it for paint. I have the Haynes manual, but it walks through disassembling the engine in the craziest, vaguest manner possible, at least to me. You seem to find some great material, would you happen to know where I could find a nice walk-through for this engine?
Also, I think that the only thing actually wrong with my engine is that the piston is seized, I'll definitely take up your recommendation with the PB Blaster and give that a shot to get that sucker loose. But I would still like to figure out how to get the engine completely apart because I'm sure it could use a good cleaning behind the ears.
Thank you much!
-Eric W.
Eric,
Congrats. Note: Be very careful with all eBay purchases. 90% are crap! It sounds like you may have found yourself a 10%'r. First off, please read my post (I think there may be two) on Things to think about during "Disassembly." If you are new to this process as I am, you will want to get all of your ducks in a row before moving forward at all. Also, this may feel like a big pain in the butt, but consider reading my blog from day one to present, because I too had a SERIOUSLY seized piston and show what it took to get it free (more than PB Blaster) and I also had many other issues, which I am sure you will experience as most restorers do. I promise it's worth the read. Before I restore my 1963 TV175 I am going to reread my entire VSC blog.
Now to answer you questions:
Great overview of restoration -- http://vespavillage.com/
Restoration of a Vespa Super -- http://www.scooterhelp.com/restorations/vbb.html
Maintenance of VBB -- http://web.mit.edu/scz/www/scoot/vbb-repair.shtml
Use Scoothelp.com to download info on your model, specifically the "parts" and "maintenance" manuals. Study those like there will be no tomorrow!
Eric, if you can salvage the original paint by treating rust and bringing back a little of the original luster of paint I suspect that would be a smarter move than repainting. If it's an option. The blog recommends products for this. It will cost at least $1000 to have it professionally painted and the value of the bike will not increase that much, if it were a MKII, VSB or an SS90, it would be a wise investment.
If you plan to do any bodywork or paint yourself, jump onto the forum at www.autbodystore.com, and ask many questions. This will prove better advice than you get on BBS, etc. These guys are hardcore and really know there stuff more than most.
Search the web relentlessly and study every square inch of your bike -- how it the day it left the warehouse.
http://www.youtube.com/watch?v=HFKiLgX5mFY&feature=related
http://uk.youtube.com/watch?v=l_Fjfs9LWRw
Email people that post videos and such on your specific bike and ask away as well.
Be relentless in your documentation of the entire restoration. Blogging forces me to record everything immediately and in great detail. It's a wonderful tool for me and the readers as well. I recommend starting a blog on the process. Walk your readers through your experience, writing it down forces you to process it.
Anything else you need at this time Eric?
Good luck and PLEASE keep me posted.
Jeremy
Eric W. wrote:
I got a 1963 VBB 150 off of eBay (no, not a vietnamese one, one that needs A LOT of work). Within an hour of owning it, I had completely taken it apart and moved all the pieces to the basement to prep it for paint. I have the Haynes manual, but it walks through disassembling the engine in the craziest, vaguest manner possible, at least to me. You seem to find some great material, would you happen to know where I could find a nice walk-through for this engine?
Also, I think that the only thing actually wrong with my engine is that the piston is seized, I'll definitely take up your recommendation with the PB Blaster and give that a shot to get that sucker loose. But I would still like to figure out how to get the engine completely apart because I'm sure it could use a good cleaning behind the ears.
Thank you much!
-Eric W.
Sunday, 6 January 2008
For my fellow newbie restorers
Dear fellow newbie restorers:
Recently, I have received emails from many of you as well as left comments on your blogs, with notes urging you not to waste your money on paint or to consider this or consider that.
Folks with common bikes are ready to jump in and fully restore them and that is fine as long as they know the financial commitment they are getting into and the fact that their bikes will NOT sell for what they pay/invest. The one thing they need to is "to know" before they role forward.
The road has been somewhat paved before us with great information available to us and friendly experienced restorers. I urge you to start here before proceeding at all. Vespa Village is a great website and will give you the "basics" and an "accurate picture of what is and isn't worth tackling" in your restoration. It focuses on the GS/SS, but its informational is universal.
You would never think that leaving your original paint with a few love-dents actually increased both the desirability for and value of your bike. Or the idea that repairing your original parts and keeping it stock often adds more value to the bike than throwing on a new performance part (depending on your model). There's a lot to think about before you jump in.
Also, a read from day one to current of this blog with a notebook and pencil in hand is a wise idea. Write down my failures as well as successes and the questions that I have asked along the way and the ones you have. Then get answers. Do this now and your restoration will be a lot less stressful and more budget-friendly.
As always you may email me directly, but please note I am no expert -- just a guy a trying to learn as much as I can.
Good luck and keep it fun!
Best,
Jeremy
Recently, I have received emails from many of you as well as left comments on your blogs, with notes urging you not to waste your money on paint or to consider this or consider that.
Folks with common bikes are ready to jump in and fully restore them and that is fine as long as they know the financial commitment they are getting into and the fact that their bikes will NOT sell for what they pay/invest. The one thing they need to is "to know" before they role forward.
The road has been somewhat paved before us with great information available to us and friendly experienced restorers. I urge you to start here before proceeding at all. Vespa Village is a great website and will give you the "basics" and an "accurate picture of what is and isn't worth tackling" in your restoration. It focuses on the GS/SS, but its informational is universal.
You would never think that leaving your original paint with a few love-dents actually increased both the desirability for and value of your bike. Or the idea that repairing your original parts and keeping it stock often adds more value to the bike than throwing on a new performance part (depending on your model). There's a lot to think about before you jump in.
Also, a read from day one to current of this blog with a notebook and pencil in hand is a wise idea. Write down my failures as well as successes and the questions that I have asked along the way and the ones you have. Then get answers. Do this now and your restoration will be a lot less stressful and more budget-friendly.
As always you may email me directly, but please note I am no expert -- just a guy a trying to learn as much as I can.
Good luck and keep it fun!
Best,
Jeremy
Wednesday, 2 January 2008
Carb cleaner
Before you jump into your restoration, bodywork, painting, or even parts cleaning (basically the whole enchilada) it would be very wise to contact the experts on auto restoration. Christopher M. turned me on to these guys. I asked them about "moving metal" and body work and I have determined that these restorers are artists of the ol'skool. Don't get me wrong, BBS is helpful, but I'd check with the guys at the forum at AutoBodyStore.com and then follow-up with BBS for confirmation.

My research shows the best way to go with a carb cleaner is to purchase Berryman's Chem B-9 Carb and Parts Cleaner.
You can purchase a 1-gallon container with a strainer inside from your local auto parts store for about $18.00. This will last you many many years. Only clean your carb and fuel filter in it. Do NOT gunk it up with other parts.
For the SS180 I will buy a 14 oz container for $4.00, because I have no need for 1-gallon since my Lambretta did not include a carb with it. I only have a fuel filter, so this amount will be enough to clean both filters.
Here's how to use it:
1) remove all o-rings and gaskets or watch them blow-up like a twinkie in micro wave (and worse contaminate your cleaner)
2) soak you item for a few hours or over night in the bucket with the strainer
3) remove it
4) wash it off thoroughly with fresh water
5) use brake cleaner spray can to clean it off and get the water off. The brake cleaner will evaporate.
These steps are thorough and you will be able to relax afterwards without a concern in the world.
Viola you're done!
My research shows the best way to go with a carb cleaner is to purchase Berryman's Chem B-9 Carb and Parts Cleaner.
You can purchase a 1-gallon container with a strainer inside from your local auto parts store for about $18.00. This will last you many many years. Only clean your carb and fuel filter in it. Do NOT gunk it up with other parts.
For the SS180 I will buy a 14 oz container for $4.00, because I have no need for 1-gallon since my Lambretta did not include a carb with it. I only have a fuel filter, so this amount will be enough to clean both filters.
Here's how to use it:
1) remove all o-rings and gaskets or watch them blow-up like a twinkie in micro wave (and worse contaminate your cleaner)
2) soak you item for a few hours or over night in the bucket with the strainer
3) remove it
4) wash it off thoroughly with fresh water
5) use brake cleaner spray can to clean it off and get the water off. The brake cleaner will evaporate.
These steps are thorough and you will be able to relax afterwards without a concern in the world.
Viola you're done!
Tuesday, 1 January 2008
Evaporust, Lloyd's Polish, & Restoration blogs
I came across a new restoration blog. It's a P-Series 150 resto. Bike looks in good shape. I would not touch with paint -- won't recoup that money in value; therefore bad investment. It can be a mechanically sound bike fairly easily I expect. There is some body rust, but I read on a Lambretta USA forum there is some great solution that removes rust and leaves the paint and metal alone on body parts. It is called Evaporust. That's what I'd recommend and then sealing up the rust to prevent spread. For cleaning up the paint and making it all pretty again I recommend looking into Lloyds WolfsHead Polish Detailer & Waterless Wash -- I read about this product and saw photos at Scooter Scoop posted on Dec. 10th, 2007. This way the paint looks at its absolute best. Before and after photos are posted for you to compare the differences.
Hell, I admitted that if I bought my SS180 in one piece, we'd leave the dents and dings and clean up the rust and give it a good wash and let it be.
Does anyone know of detailed blogs that are out there? If so, please post a comment and I will link them to this blog.
I am really interested in blogs that go into great detail on the resto and don't just have a paragraph and ten photos for every major step in the process. I want a blog I can really learn from. I want to become good at restorations and I aim to do all work myself on my Lambretta TV175, including paint with my uncle (who restores vintage cars).
I want to be like this guy.
Vespa folks talk with Lammy folks. They are SUPER nice and many know their #$%t. I find them to be very helpful -- weird coming from a Vespa restorer?
Damn, I am fired up to get this SS180 done so I can start saving money to begin my TV175. I daydream about how great it will be to hear the VSC fired up for the first time.
I just want to learn!
Hell, I admitted that if I bought my SS180 in one piece, we'd leave the dents and dings and clean up the rust and give it a good wash and let it be.
Does anyone know of detailed blogs that are out there? If so, please post a comment and I will link them to this blog.
I am really interested in blogs that go into great detail on the resto and don't just have a paragraph and ten photos for every major step in the process. I want a blog I can really learn from. I want to become good at restorations and I aim to do all work myself on my Lambretta TV175, including paint with my uncle (who restores vintage cars).
I want to be like this guy.
Vespa folks talk with Lammy folks. They are SUPER nice and many know their #$%t. I find them to be very helpful -- weird coming from a Vespa restorer?
Damn, I am fired up to get this SS180 done so I can start saving money to begin my TV175. I daydream about how great it will be to hear the VSC fired up for the first time.
I just want to learn!
Sunday, 30 December 2007
Eric's SS180 is complete
Eric beat me and finished up his restoration (minus the glove box) of his 1966 Vespa VSC. You can see photos and blog entries at Eric's website
Congratulations Eric!
Congratulations Eric!
Monday, 8 October 2007
The Vision (for when all is said and done)
In speaking with Stu I decided to use an R1/R6 shock conversion for my rear shock. He sent me to Lambretta Club of America (lambretta.org) where a group of guys were going in on a bulk order of shock springs and bushings for the conversion.
Wow! I'd first like to say that the folks in this club are so nice and helpful. These guys offer solutions and share information. The guy, Jake, who placed the order for the springs and bushings not only fronted the cash for everybody, he even drove from San Mateo to SF to deliver my parts to my dad's office. Seriously, good people at the Lambretta Club of America!
Sorry I digress . . .
 While perusing the rest of the site I found a section on the "forums" where folks post pictures of their Lambretta's and I came across a 1962 Lambretta TV175 restored to Stone White with a Ox red seat . . . it is exactly the same bike that I have and I have decided to restore it to its original color as well as reuse my red seat. Looking at these photos of this Lambretta is basically like looking at my bike after the restoration is complete.
 The bike first looked like this. It was restored by Mike Anhalt, a member of Lambretta Club of America. His post said, "Fully redone TV175 with a GT186, 24mm mikuni, Casa Exhaust. All stainless hardware and proper stickers with orgional floor board extentions. Took about 7 months start to finish (50 hours of 2 hour weekends and mornings)."
 Mike wrote the bike was an East Coast rust scoot when he first got it. He was hired by someone to restore it as if Mike was restoring it for himself.
 The bike looks a little rougher than my bike, but then again it was 100% complete when Mike received it -- as far as I can tell from the photos.
 The beauty in this bike is in the details, I believe. It is clear to me that Mike Anhalt is an experienced restorer and has the eye-of-a-jeweler -- all the small details matter to him. That is the mark of a true restorer. Notice the R1/R6 shock conversion, not stock, but an inexpensive way to build a performance rear shock. I will also build a R1 shock for my TV.
 At first I thought that all white scooters were a bit of bore, but with the ox blood red seat the bike really pops. Furthermore, the idea of having the bike look nearly exact the way it did coming out of the factory over 40 years ago seems very cool to me.
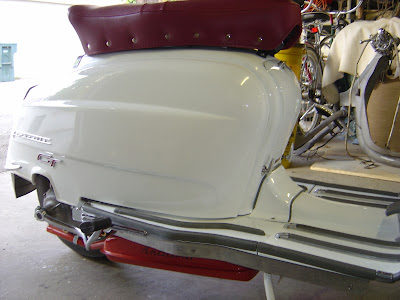 I will not add a GT badge on my Lammy, but I will use a Dean's Speed 190 kit so performance wise it may not be different than the 186 kit Mike put on the top end of this TV.
All in all my bike will look pretty similar and also be very mildly customed. My goal, like Mike, is to keep the TV as true to the era.
If bike comes out anything like the one above, I will be so happy.
Wow! I'd first like to say that the folks in this club are so nice and helpful. These guys offer solutions and share information. The guy, Jake, who placed the order for the springs and bushings not only fronted the cash for everybody, he even drove from San Mateo to SF to deliver my parts to my dad's office. Seriously, good people at the Lambretta Club of America!
Sorry I digress . . .
 While perusing the rest of the site I found a section on the "forums" where folks post pictures of their Lambretta's and I came across a 1962 Lambretta TV175 restored to Stone White with a Ox red seat . . . it is exactly the same bike that I have and I have decided to restore it to its original color as well as reuse my red seat. Looking at these photos of this Lambretta is basically like looking at my bike after the restoration is complete.
 The bike first looked like this. It was restored by Mike Anhalt, a member of Lambretta Club of America. His post said, "Fully redone TV175 with a GT186, 24mm mikuni, Casa Exhaust. All stainless hardware and proper stickers with orgional floor board extentions. Took about 7 months start to finish (50 hours of 2 hour weekends and mornings)."
 Mike wrote the bike was an East Coast rust scoot when he first got it. He was hired by someone to restore it as if Mike was restoring it for himself.
 The bike looks a little rougher than my bike, but then again it was 100% complete when Mike received it -- as far as I can tell from the photos.
 The beauty in this bike is in the details, I believe. It is clear to me that Mike Anhalt is an experienced restorer and has the eye-of-a-jeweler -- all the small details matter to him. That is the mark of a true restorer. Notice the R1/R6 shock conversion, not stock, but an inexpensive way to build a performance rear shock. I will also build a R1 shock for my TV.
 At first I thought that all white scooters were a bit of bore, but with the ox blood red seat the bike really pops. Furthermore, the idea of having the bike look nearly exact the way it did coming out of the factory over 40 years ago seems very cool to me.
 I will not add a GT badge on my Lammy, but I will use a Dean's Speed 190 kit so performance wise it may not be different than the 186 kit Mike put on the top end of this TV.
All in all my bike will look pretty similar and also be very mildly customed. My goal, like Mike, is to keep the TV as true to the era.
If bike comes out anything like the one above, I will be so happy.
Thursday, 9 August 2007
In Pieces
Here is what the TV currently looks like. We also bought our SS180 (visit: www.vesparestoration.blogspot.com) in pieces as well. I HIGHLY recommend first time restorers do NOT buy a scooter this way, especially a Lambretta with all its parts. It's a good way to buy an incomplete scooter unknowningly, which will cost you a lot more in the end potentially. We bought the Vespa SS180 from a friend we have known and trusted for a long time. We bought the Lambretta TV175, pictured below, from Stuart Werner who has a very good reputation for being honest and upfront, plus he is also respected for the quality of his bikes he sold after restoring himself. We spoke with mentors Tom G. and Christopher Markley before purchasing and the advice they gave me, "is go with it Jeremy. Stu is honest and will tell you what you're missing and what it will cost you." The bike is not complete and Stu did point it all out and after more research I have learned it will cost $$. I can spend just under $1,000 on the suspension alone (if I get the set up I want, which I won't because $1,000 for three shocks is over kill for my purposes). So think about that! I paid $1100 for my TV with two motors and a missing disc brake/front hub and all three shocks. The front hub is $450 new and three performance shocks are $900; therefore the bike is not $1100 rather it is $1350. You need to think carefully when restoring a bike. A complete unrestored TV engine will bring about $500, so you can see that's not balancing the books. I may decide to fully restore the second TV engine and hold on to it for collector's sake or sell it to generate revenue for the restoration of the bike. I have seen original running TVs sell for under $3750 and I can guarantee that my bike will be close to $5000-$6000 in parts/paint. I am totally cool with that and knew that going into it. Just make sure you are too.  Note that my second engine, which is 90% complete, is in my basement and not included in these photos.

 Note that my second engine, which is 90% complete, is in my basement and not included in these photos.

Friday, 18 May 2007
How to disasemble a Lammy Li
Lambretta LI Stripdown 60's promo film made by Innocenti for dealer and there mechanics. (thanx to scootr99 on YouTube.com)
Wednesday, 14 February 2007
Feb. 11, 2007 -- The Purchase: 1962 Lambretta TV 175
When hunting down a fuel tap wrench for 1967 Vespa SS180 restoration project we called Stewert Werner to see if had one we could borrow, because the wrench was not available for purchase and if you can borrow it's a penny saved. We asked him if he had any Lammys for sale and he said, "no." When we called to tell him we found a wrench he said, "by the way I found a 1963 TV 175 in the rafters in my garage. Want to buy it?" In late December, 2006 we went to Stu's house to check out his "1963 Lambretta TV 175 with two motors" he had for sale. We liked what we saw. He spent hours with us going over what parts were missing and all of the resources (trustworthy ones only) that are available to us for this restoration. He also showed us what books we should purchase and which weren't so good. He also recommended upgrades, ie GP electric, and explained in detail how that can be done. He gave us the history he knew of, which is limited. He bought the bike from Scooters O in NJ.  It was imported from Italy. Stu had planned to restore and resell. He owned Lancaster Lambretta and has personally put many bikes on the road. Stewart had asked for $1,300 for the scooter, which was 98% complete except for some common and pretty-easy parts to find. At the time we did not have the full amount. We offered him a deposit and he just smiled and said, "how about a handshake?" We shook hands. We agreed to meet in three to five weeks. Normally I would never buy a disassembled Lambretta, because I am not familiar with all the parts and would not know what is or is NOT missing.
I knew Stu's reputation for being a person of integrity and checked in my mentor of restorations, Christopher Markley, and a few other people about the deal. The response I got was, "it's a very good deal, especially with two motors, and Stu will be very honest and upfront with you," which has proved to be true.
Stu offered to create a total parts list for me and give me the list. He also offered to go through his personal stock pile and look for any parts that are missing from the TV. His machinist destroyed the TV 175's forks -- so Stu offered Li S3 forks instead along with a weld job to remove the TV rings, which are unique to the TV, and have them welded to the Li forks (the rings are the only noticeable difference to these forks when the bike is assembled). Stu also offered me a few xerox copies from his "secret Lambretta file," which I will not disclose.
On February 11, 2007 Stu asked me to come over and pick up the bike -- he wanted his garage back. He needed to get us a disc front brake to include in the deal from a second bike, but was not able to; therefore he dropped the price to $1,100 thinking he had originally asked $1,500 for the bike. I reminded him he asked $1,300 for the bike so he dropped the final sale to $1,000 even and said that was as low as he could go. A front disc brake costs $430 new and we have half it. Stu kept the two forks for his welder (all included in the final price) and I cut him a personal check.
He also agreed to deliver the finished front fork to us along with the parts list. He said he would like to go over the parts list in detail with us as he looks over the entire bike with us one final time to make sure the parts list is perfect. I think that speaks volumes about who he is as a person. He is of the old world when a handshake was enough. He's a dying breed in today's society.
After I brought the bike bike home I cross-referenced the Serial Number: TV175 503***and learned the Lambretta is actually an 1962 bike as opposed to 1963.
Restoration on this bike will begin after we complete the restoration of my wife's bike -- a 1967 Vespa SS180. Restoration of this bike is half complete at this time and is documented at www.vesparestoration.blogspot.com.
Below is a picture of Stu Werner sitting on his late 1950s Series I "Frame Breather" with his kitted blue/white Series III and cream Series II Lambrettas.

 It was imported from Italy. Stu had planned to restore and resell. He owned Lancaster Lambretta and has personally put many bikes on the road. Stewart had asked for $1,300 for the scooter, which was 98% complete except for some common and pretty-easy parts to find. At the time we did not have the full amount. We offered him a deposit and he just smiled and said, "how about a handshake?" We shook hands. We agreed to meet in three to five weeks. Normally I would never buy a disassembled Lambretta, because I am not familiar with all the parts and would not know what is or is NOT missing.
I knew Stu's reputation for being a person of integrity and checked in my mentor of restorations, Christopher Markley, and a few other people about the deal. The response I got was, "it's a very good deal, especially with two motors, and Stu will be very honest and upfront with you," which has proved to be true.
Stu offered to create a total parts list for me and give me the list. He also offered to go through his personal stock pile and look for any parts that are missing from the TV. His machinist destroyed the TV 175's forks -- so Stu offered Li S3 forks instead along with a weld job to remove the TV rings, which are unique to the TV, and have them welded to the Li forks (the rings are the only noticeable difference to these forks when the bike is assembled). Stu also offered me a few xerox copies from his "secret Lambretta file," which I will not disclose.
On February 11, 2007 Stu asked me to come over and pick up the bike -- he wanted his garage back. He needed to get us a disc front brake to include in the deal from a second bike, but was not able to; therefore he dropped the price to $1,100 thinking he had originally asked $1,500 for the bike. I reminded him he asked $1,300 for the bike so he dropped the final sale to $1,000 even and said that was as low as he could go. A front disc brake costs $430 new and we have half it. Stu kept the two forks for his welder (all included in the final price) and I cut him a personal check.
He also agreed to deliver the finished front fork to us along with the parts list. He said he would like to go over the parts list in detail with us as he looks over the entire bike with us one final time to make sure the parts list is perfect. I think that speaks volumes about who he is as a person. He is of the old world when a handshake was enough. He's a dying breed in today's society.
After I brought the bike bike home I cross-referenced the Serial Number: TV175 503***and learned the Lambretta is actually an 1962 bike as opposed to 1963.
Restoration on this bike will begin after we complete the restoration of my wife's bike -- a 1967 Vespa SS180. Restoration of this bike is half complete at this time and is documented at www.vesparestoration.blogspot.com.
Below is a picture of Stu Werner sitting on his late 1950s Series I "Frame Breather" with his kitted blue/white Series III and cream Series II Lambrettas.

Saturday, 6 January 2007
Fork & Shock Disassembly
It's my intention to rebuild the front fork according to the "how to" link in my "Resources" list in the Blog navigation bar. I also plan thoroughly clean and baum spray my forks. I will Zinc plate my shock housing, according to Tecnica this is how the original shock was done.
When rebuilding the shock use the parts book for GS/SS from www.scooterhelp.com and the diagram is far more detailed than the SS one is.
 First, I ordered a replacement dampner seal for the front shock for $10 (very hard to find) from Motor Sport Scooters and I purchased the second to last one in existence & from what I later learned the last one was also purchased. Suggestion -- you'd be surprised with what seals and rings your local vintage motorcycle shop has in stock. I know that a local vintage motorcycle shop my buddy, Ted Witmer, frequents specializes in "suspension" and he has found a hard-t0-find piece of rubber for my shock there as well when every single scoot shop I called did not have the part. Next I need to replace the pivot pin (pictured to the left) -- part #47 in part book drawing below. From what I understand it is not the easiest part to find; therefore be careful when removing in case you need to reuse. I will follow-up to this post and report on my search for this part #55271.
 To disasemble the fork from the shock, you need to remove the cotter pin "screw" (#47 in the part book drawing) located near the grease nipple, then just push the pivot pin sideways. You can loosen the nut and put a socket behind the pin and pressed it out with a vise. Once the tapered pin is out, the pivot pin should just push out with your fingers. Try not to damage the tapered pin -- as stated it may be difficult to find a replacement, but if you can throw the old pivot pin and bearings away and get a rebuild kit.
A BIG thank you to Flaco, Trace, The Self Presevation Society, and all others from Scoot BBS for the help.
Note: more information to follow as it is completed.
When rebuilding the shock use the parts book for GS/SS from www.scooterhelp.com and the diagram is far more detailed than the SS one is.
 First, I ordered a replacement dampner seal for the front shock for $10 (very hard to find) from Motor Sport Scooters and I purchased the second to last one in existence & from what I later learned the last one was also purchased. Suggestion -- you'd be surprised with what seals and rings your local vintage motorcycle shop has in stock. I know that a local vintage motorcycle shop my buddy, Ted Witmer, frequents specializes in "suspension" and he has found a hard-t0-find piece of rubber for my shock there as well when every single scoot shop I called did not have the part. Next I need to replace the pivot pin (pictured to the left) -- part #47 in part book drawing below. From what I understand it is not the easiest part to find; therefore be careful when removing in case you need to reuse. I will follow-up to this post and report on my search for this part #55271.
 To disasemble the fork from the shock, you need to remove the cotter pin "screw" (#47 in the part book drawing) located near the grease nipple, then just push the pivot pin sideways. You can loosen the nut and put a socket behind the pin and pressed it out with a vise. Once the tapered pin is out, the pivot pin should just push out with your fingers. Try not to damage the tapered pin -- as stated it may be difficult to find a replacement, but if you can throw the old pivot pin and bearings away and get a rebuild kit.
 A BIG thank you to Flaco, Trace, The Self Presevation Society, and all others from Scoot BBS for the help.
Note: more information to follow as it is completed.
Body work 30% done
 I took these pictures two or three weeks ago when I posted the engine-side cowl restoration post. The body required mild to moderate work. Since these photos I am sure it looks a lot different.
 There are a few "dents." Note the dent beneath the tail loght area and the two dents on the front of the scooter on the pictured above.
The streaking color you see here is a normal by-product of the PPG cleaner and conditioner I used on it.
 The front fender had a slight tilt to it and some nicks and nacks. If you look at the "history" post you can see what it looked like before -- when it was still complete. I suspect the bike had been laid down once or more.
 The glove box metal was thin on the underside in a few spots, but all in all in good shape.
 As you can see this cowl is in MUCH better shape than the engine-side cowl was. My only concern is with the wider (incorrect) louvres I used on the engine cowl is the inconsistency with the manufacture's ribs on the picture cowl here. On the flip side, it's not possible for a person to look at both sides of the scooter at the same time without a mirror - ha.
You can see pictures of the engine-side cowl in the "engine-side cowl restoration" post on this blog.
Subscribe to:
Posts (Atom)