Showing posts with label hardware. Show all posts

Friday, 20 March 2009

Grinding hardware stamps

As you know the stock kickstand hardware was not stainless steel, nor did it have a stamp on it. I want stainless steel, but I do not want the stamp; therefore I grind'd all four bolt heads for the kickstand hardware. Also note that there are two different washer sizes here. I was in a hurry before I moved West so I just got the bike together. Now that I am settled I can correct those minor errors.

I used my Dremel and just very lightly ground down the stamps and made it all look even. I was able to handhold the bolts.


It is my hope that over the time the bolt head will weather a little bit and look a little more stock with less glossy shine on where I polished it with the Dremel.

Monday, 26 May 2008

Torque settings

Today, I will torque all the nuts and bolts on the VSC.

Thank you to Hiro, who sent me the link to the following torque guide:

I've been told that the you can use the VSC info for torquing a P-Series too.
The Vespa Super-Sports Yahoo Group has a ton of good information on it. That is where the torque guide came from. Make sure to check the group out.

Monday, 25 February 2008

Parts Purchase

Using Ted W.'s 20% discount, on Saturday he picked up the following items from B & B Yamaha:

1) Light bulbs for front & rear tail lights

2) 2 Qrts of Yamalube 2cycle oil

3) A variety of nuts and bolts (metric). The smaller n/b will be purchased at the local hardware store.

4) Spark plug NGK B6ES (2 more are on order)

5) Gas line tubing

TOTAL (about): $25

That's it for now. I am still working on finding non-Indian grommets. I have two leads.

Sunday, 24 February 2008

Fender Hardware Sizes

I have received a few emails requesting the size of the hardware for the front fender to steering column.

Thanx to Eric W., who provided me with this:

"I just put the fender on the fork friday. The top of the fender is 3
slotted m3 bolts. They are 3/4 inch in length. The two on the side of
the fender are slotted m5 bolts. They are 1/2 inch in length." -- Eric

Correction:

"Yeah, the top bolts are not 3mm. They are 5mm x .80 x 18mm hex head bolts, no markings on the head. Good place for stainless since you can polish off the bolt head markings, and it's a non high stress location." -- Paul

Saturday, 2 February 2008

Hardware Disassembly

Disassembling your bike?

Keep it organized. Visit Scooter Help and download your Vespa's or Lambretta's parts catalog for free and follow the advice below:

"I am not sure how do you organize your nuts and bolts when you take your bike apart. But I, at least, organized the hardware into separate by using parts manual. For example, I only stock the hardware in one storage by one figure describe on it, such as T.1/1 or T.2/1. That makes things super easy when you reassemble a bike. When you need the hardware re-chroming, you need to take photos for each storages using a metric cutting mat. I guess this is what Tom G. taught to me a while back." - Hiro

Thanx Hiro. That is sound advice and all you have to do is follow the picture in the parts manual, ie T.1/1.

Thursday, 31 January 2008

Vespa Hardware Sizes

I have been hunting archives and the web for a complete list of Vespa large frame hardware sizes and I have failed. I emailed individuals and sadly no one has such a list. I found an site called Scooter Culture, but it's no longer live.

I posted my request on Scooter BBS and thank you to John Stafford, who suggested to use a web time machine to look up the URL of scooter culture and low an behold I now have my 
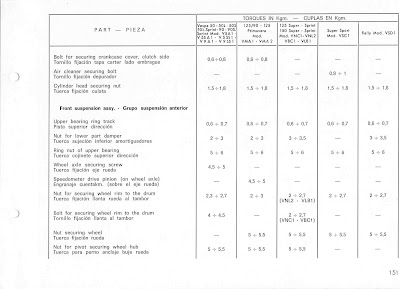
list of metric sizes for the hardware and fasteners.

Your best bet is to open the link and create a PDF and print it. If that does not work click on the JPEGs below and print. I can not post PDF documents or I would and it would print better.


The fender to steering column bolts are 5mm x .80 x 18mm hex head bolts, no markings on the head. Good place for stainless since you can polish off the bolt head markings, and it's a non high stress location.

Furthermore, in speaking with Collin W. and Dave C. said:
"Basically, just get yourself a large assortment of M5-M8 Nuts, bolts, and wavy washers, and you're good to go. Parts falls off scooters sometimes too, so it's handy to have extras around anyways." -- Collin

"On a more serious note on nuts and things....

Vespas are pretty straight forward in this respect. Perhaps, this is why no list exists - it isn't strictly needed? There are a few odd-ball threads:

The earth stud is, for some unaccountable reason, M3.5, so needs a wingut and plain nut to match (Tap out an M3 when stuck).

The front suspension damper top nut is M8 with a fine thread pitch of 1.5 (I think?). This was, originally, a 14mm wrench drive size. Try getting hold of one of them!

Early(ish) GS 160's had M6 brass wingnuts holding the rear light in place (Bizarre!).

For the same GS's and earlier models, the gear adjusters were, also, brass and had matching lock nuts.

The M7 plain hex crankcase nuts can be difficult to source in the UK away from a scooter shop.

The seat/tank retaining bolts are also M7 (Later Vespa models did the sensible thing and were fitted with M8 bolts).

Headlamp rims are held in place by M4 raised countersunk slotted bolts (15mm length).

God only knows what type of threads are used on the carbs (Actually, God AND Delorto!).

Think that's about it on the dodgy sizes and types?

Apart from those items listed above, I can walk into my local fixing suppliers and buy everything else across the counter - even if I ask for STAINLESS STEEL?" -- Dave C.

If you know of another list or have one that is more complete or has different stuff on it please let me know. I would like to offer a Vespa hardware list as complete as the Lambretta hardware list that Gene, from Scooters O, published.

Wednesday, 30 January 2008

Polishing your parts

Polishing parts is a very good idea to save pieces that you might otherwise think are junk. This is especially helpful with internal engine components and hardware. I have been doing a few different techniques lately to restore the beauty in parts and I have found that nothing works better than a bench grinder that has dual wheels. One wheel is typically a graphite stone grinder (DON'T USE THIS SIDE! YOU WILL ACTUALLY TAKE METAL OFF AND THIN YOUR PARTS!) and the other wheel is a heavy duty wire polisher (the side we will be dealing with). This tool is an extremely expensive investment, so if you don't already have one, you might want to try and make friends with some one that does! Luckily, my step-father has one. I can't even begin to explain how well this method works. Last weekend I used it on my gear selector, my clutch cover, my piston, and my cylinder and some random hardware. These parts were rusty, grimy, and extremely dirty. Now they look like they just rolled off of the factory assembly line.

Today, I tried to use a dremel with wire grinding tips to polish some parts. I don't recommend this method at all except for maybe very mild use to get into crevasses that you can't reach with the bench grinder. It works pretty well, but little bits of wire fly off of the dremel bits until all of the wires are gone and you're left with nothing. And this isn't a slow process. I bought two bits this afternoon. Within an hour of usage, both bits were reduced to nothing. So, don't do this more than necessary. Because of little wire fragments flying everywhere, I would especially not use this method on internal engine components as an alternative to taking the parts out of the case and using a bench grinder. It is absolutely crucial that the inside of the engine is COMPLETELY free of debris when reassembling it. And this frankly can't be accomplished with all of those little bits of wire flying inside the case. Take the time to take out the individual pieces and use the bench grinder. Your engine will thank you.

You may be tempted to wire polish your casings. While this will look very nice, a lot of people don't recommend it. Jeremy's blog goes into detail about it, but simply put; the engine case will get dirty, and fast. If you don't want to clean your engine case every day of your life, don't set it up for these high standards. Media blasting or a good scrubbing with paint thinner is sufficient.

Ciao.

Tuesday, 29 January 2008

Hardare & Fasteners Part 2

A huge thank you to Paul B. for posting one the best comments this blog has seen yet in response to the previous post on hardware.

Paul B. commented:

"No. Stainless steel is FAR weaker than good quality mild steel. For most, non stress application, stainless steel RULES! I am a BIG stainless fan. But for stressed applications, like say, holding the wheels on, or, suspension components, original spec. mild steel (#5) nuts only. I mean, there really is no reason (other than for a show bike) to deliberately REDUCE the strength of the fasteners holding your (or wifes in this case) wheels on. Especially when the correct fasteners are readily available from Piaggio. Also, your original wheel changing tools will no longer fit the wheel nuts since, as you say, the stainless nuts require a 13mm wrench, and the original nuts are 14mm."

Thank you again Paul B. for commenting. I owe you big. You opened up a great conversation and I began to research it a bit by emailing my mentors for how they handle fasteners on their restorations as well. The bottom line is I will probably use galvanized steel now as opposed to stainless steel, based on your's and Tom G.'s suggestion.

Here is what I learned from Tom G.:
"It is true that stainless is weaker in tensile (and probably compressive) strength than mild steel, and of course this applies to fasteners.

That being said, I can't really think of an instance on a vespa where this will make any difference from a safety perspective. I can't begin to imagine that stainless wheel nuts would be unsafe to use.

That being said, I don't really prefer the look of stainless to galvanized for wheel nuts, and most of the time I use galvanized for them. I do frequently
use stainless for attaching body parts (like attaching front fender to fork on vespa, and attaching most lammy body panels to the frame). Is this really a
good idea? It is an open question. Where you use dissimilar metals next to one another, the less "noble" metal corrodes preferentially. In other words, if you use stainless fasteners to hold steel panels in place, the steel panels will corrode
(marginally) instead of the stainless fasteners that are in electrical contact with them. If you were to use bare steel fasteners on painted steel panels, the
fasteners would corrode more quickly (and the panels would not corrode in the vicinity of the fastener as long as electrical contact is maintained). This is
why roofers don't use iron nails to hold copper roofs in place -- the iron nails will completely corrode away, while the surrounding copper will not corrode.
So strictly speaking, from a corrosion and protection of metal standpoint, the best solution is to use galvanized steel fasteners on painted steel panels.
It is an extra "bonus" that this will also give you the correct look. But only anoraks will care.

Good luck getting wheel rim nuts in 14" size anyhow. They ARE available from some specialty shops, but are quite expensive. I never bother. Frankly, I'm not
even sure that the 14" nuts were used on the SS anyhow. Do you know for sure? They were used in some places on the GS 150, and I think also for the GS160.
But I'm pretty sure that by the Rally, the 8m hardware was all 13mm. I'm unclear on the SS.

If you can itemize the locations you want to use stainless, I can give you my best guess as to whether that might present any problem." -- Tom G.


Wednesday, 2 January 2008

Hardware

Pictured above are my new stainless steel / zinc plated lug nuts and split washers. Besides the new are the old. You will notice two things: first the newer nut is smaller than the original and secondly on the newer hardware they are stamped with an ID (not in picture. It's on the opposite side of the nut). The hardcore restorers GRIND this stamp off each piece of hardware, but Lisa, my wife and owner of this SS180 is not THAT concerned and is fine with them being installed as-is.

I chose stainless steel because it is so much easier to keep it looking clean and rust free, but keep in mind many will disagree with me.

You do have another option of course, collect all your externally showing nuts, bolts, washers and clean them up. Then fill them into small coffee tin and send them off to the chrome plater's shop and pay approximately $80-$100 to have your original ones restored to original condition. This is what a true purist would do.

The final option you have is buy a engine and chassis hardware package, if available for your specific scoot, from American Scooter Center in Austin, Texas for $79. I do not know the quality or composition of the metal. What I do know, is most restorers will not need at all of this hardware, but I admit it is a convenient way to go.

I will likely spend $50 and under for all my stainless steel hardware I expect. The lug nuts & washers cost me about $6.00.

If you need zinc plating, black oxide finishing, or metal polishing, I recommend Moto Rapido. I know Tom G. has used Moto Rapido for plating and I am quick to use any shop that Tom or Stuart Werner use -- plus I already know Christopher Markley rocks!