Showing posts with label floor rail. Show all posts
Showing posts with label floor rail. Show all posts
Saturday, 31 May 2008
Floor rail install slideshow
After installing my floor rails, I feel well prepared to give you the break down in a digest format, which I believe will provide you with the critical information needed so that you can confidently install your own floor rails with ease (or as easy as it can be for a newbie). Please leave a comment if I have left anything out.
Here's what I did:
1) Do your research. Start by reading and looking at the pictures on these two posts: research post and step-by-step install post. Make sure you read the comments left too.
2) Before your scooter goes to the paint shop you MUST buy and dry install your floor rail kit. Everything must line up perfectly before the body goes to paint.
If you buy a new floor rail kit, I highly recommend searching for a kit that has no holes punched in it and will also require you to cut it to length. Such a kit was made at one point in Canada and the Brit scoot shops sold it. There have to be more of these out there.
Through extensive research I have learned that the Pascoli floor rail kit is no easier than the Rally kit to install so therefore I kept my Rally kit. My holes did not line up and if I could do it all over again I would have had the holes in body filled before having the bike painted and I would drill new holes to ensure everything fit (mark the new holes for the painter). When you hog out the holes in your rail they become much more oval shaped and this allows them to move during install.
3) If you floor rails do not line up flush with the floor board, use a hair dryer on the lowest setting to warm them. Now use a hook with rubber on it and screw it into a piece of wood for leverage and roll your floor rail to shape. Only apply pressure to the base, not the lip, of your floor rails or you will crush it If a gap still exists, leave the floor rails on so your body/paint guy can straighten your frame.
4) For the arch on the front of the floor rails put a propane camping bottle in your vice and clamp down. Now put a sock over your warm floor rail and GENTLY roll in the shape a tiny bit at a time; frequently checking so you don't curve it too much.
5) Make sure the end caps fit properly and that the rivet will not be at too much of an angle. Mine were and this cause the end caps to move slightly so a couple of them did not sit perfectly flush with the floor rail end.
6) File the mold off your end cap and polish it with Mother's Chrome Polish.
7) Examine each end cap and select each of the 12 ends in order to hide the blemishes of the file on the end cap. Number each end cap and end rail 1-12 so you remember which one goes where.
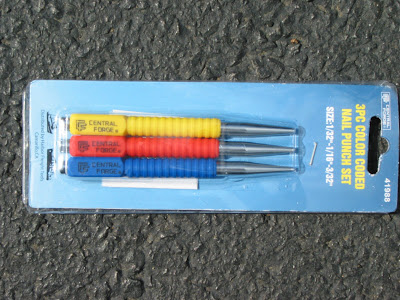
8) You will need to make two punches. Go to your local Harbor Freight Tools and spend a $1.67 for a 3-piece nail punch set on sale. Cut them back so the diameter is huge. For the "waffle" make a three cuts across in each direction with a hack saw. Then file them. Leave it waffle tips square -- don't angle them -- it won't look good. With the other punch (or bolt like I used) drill out a cone shape to slip into the end cap head to hold the rivet head it place while hand peening.
9) When the bike is back from the painter put a nice thick protective paper cover over your floor board. Double check all the holes line up. Now file out -- do NOT drill out -- the holes in your frame. Once they are cleaned out enough for the rivets to fit through seal the holes with an epoxy-based paint to protect your frame from rust. Let dry.
10) I opted to pop rivet my rails and to hand peen the 12 end caps only. I purchased all aluminum pop rivets. Pop rivet guns are cheap. Pop rivet the floor rails, but do NOT tighten them all the way or you will bend the rails. Only tighten them all the way after you have every hole pop riveted. Also, make sure the out rail rivets are flush against the body and not hung up on the outer lip. Many people prefer to use washers with pop rivets.
11) With a heavy flat weight press up against the bottom of the pop rivets and use a punch and a ball peen hammer (need a friend for this) to flatten the buttons left in the floor rails so the rubber will fit.
12) Fill up a big pot with warm water and soak your rubber. It will be more pliable and lubricated by the water to slide it it. Slide the rubber in place and leave about 1/2 inch on each side (you can get away with a little less). Over time your rubber will shrink and the excess will come in handy.
13) Start on the inner back end cap first in case you mess up. Put the end cap on and the rivet through. Cut the rivet just shy of a 1/2 inch. If you leave too much and you wack too much and too hard it will leave a dimple in your frame. Sadly, I have two.
14) Drill out a refridgerator magnet for the rivet end to go through.
15) Read up on "hand peening rivets", then practice, and watch this hand peening video.
16) After you hand peen the rivets come back with the waffle punch and have a friend hold the anchor against the rivet button and use a ball peen hammer (flat side) and give two good wacks. But be CAREFUL not to wack too hard or you will leave a dimple in your frame. I will need to take a macro shot of the waffled rivet(s) and post it. You can see it on the slide show at the top on the back bottom of the scoot.
ALTERNATIVE IDEA:If I did not have a rare bike, I would pop rivet the entire floor rail. I wonder if I use my yellow coned out punch, which fits inside of the end cap, that if I gently punched the head of the rivet if I could shape it into a button. I think I could, but it may not look perfect on every button . The secret would be to make a very tight little cone so it uses all of the excess aluminum in the head. I like how uniform pop rivets look, but I don't like the hole left in the donut. In a perfect world, all bikes would be blind riveted.
As usual, if you would like a specific photo posted please leave a comments and ask.
Next time:
If I were to this all over again I would use the pneumatic air chisel approach that Self Preservation Society posted on BBS and use rivets on everything. No pop rivets.
Wednesday, 21 May 2008
Hand Peen Rivet
Sadly, this is a poor quality video taken from a digital still shot camera. I don't own a high quality video camera that talks with my Mac -- so this video will have to suffice.
My goal is to introduce newbies to the art of hand peening rivets for the floor rail of your scooter.
The process goes like this:
Preparation: file the holes in the frame out with a circular hand file and coat the bare steel with a thin coat of paint so it does not rust in the future.
1) Drill a hole in a refridgator magnet to protect the paint around the rivet (thanx Tom G.)
2) Stick the rivet through and measure some where between a 1/8 to 1/4 inch (depending on the size of the hole the rivet goes through -- ie did you drill it out?) of visible the rivet and cut off the rest.
3) Put pressure on the rivet head (anchor it) with a cone shape to preserve the "button" on the rivet head.
4) Tap straight down on the rivet until it gets a little lip on it.
5) Now tap at a downward angle. Walk around it 360 degrees. It will mushroom.
6) Flatten it out again. Steer the rivet if you need to move it in one direction or another.
7) Angle it again and "walk around the rivet".
-- Repeat, repeat, repeat! --
Once the rivet is compressed/expanded go ahead and leave a small mushroom. Now take your waffle punch and give it one or two good wacks with the flat side of your ball peen hammer (do not use a larger/heavier hammer or you will dimple your frame).
Viola!
Saturday, 5 April 2008
Step by step: floor rail installation
Before you go further, I recommend seriously considering Pascoli's floor rail kit and not the standard Rally kit.
If I replaced my legshield trim with Pascoli's ($67) and my floor rail kit ($170) my bike would be more period correct -- totaling $237 plus shipping. I spent under $70 with shipping for my set up, which other SS180 owners have used. So for a grand total of $307 plus shipping we can have it correct (with our $70 already invested). The question is would we see a return on this investment if we sold the bike. Is it like a new kitchen or bathroom where your guaranteed a return? Is it important enough to the owner Lisa to have it period correct? This is a moot point considering we don't have $300 to spend right now. We have some huge expenses coming and it will be a long while before the toy penny bank starts filling up. We will roll with what we have and some time down the road I will fix the seat and replace these items.
This blog post will comprehensively cover one way to install floor rails. After five or more hours of phone calls, web searching, emails, and two web forums I decided to pop rivet everything, but the end caps on the floor rail kit. The end caps will be hand peened into a mushroom and then waffled to look manufacturer stock.
Day one:
After three hours work we had one outer rail pop riveted on and all three left side floor rails shaped and the holes cleaned out and lined up. We spent 45 minutes planning and discussing our plan of attack. We learned a lot and the rest should go much faster.
I will add to this entry until it is complete. Please re-visit as it is incomplete in this state.
 In retrospect, I wish I bought the $170 Pascoli VSC floor rail kit instead of the $47 Rally kit. We'll get into that later. Pictured above is the Rally kit made by Olympia (Italian).
 Here you can see the original rails beside my brand new ones. A rough measurement showed them to be very close in length and shape. The Olympia kit is probably over an inch shorter -- at least on the outer rails. I have heard that CIF brand is longer and would be better to use, but I do not have first hand knowledge of this.
 The end caps of the Olympia kit are on the right and left is stock.
 At a closer look you can see the mold the new end caps came from left a knob. I will use Wetodry sandpaper to sand that off. I bought a variety pack and will hit will 2000 grit wet paper. Then I will make sure those end caps face inward so no one sees that I sanded them.
 Ted owned a pop rivet gun and last week we determined the pop rivet size required. I will post later. If you click to enlarge the photo you can read the sizes he bought. We used the larger.
 We cleaned out the paint from the holes in the frame to make sure they would accept the rivets.
 Run a small pilot through all holes and then a larger drill bit for all holes, but NOT the end caps, because the rivet is smaller.
 Do not wipe the drill shavings off with a cloth. You'll kill your paint. Blow it off.
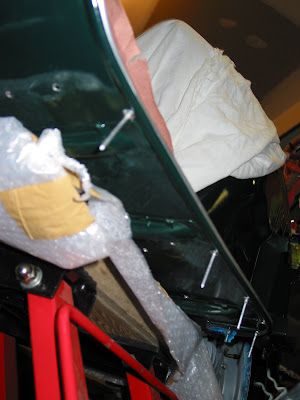
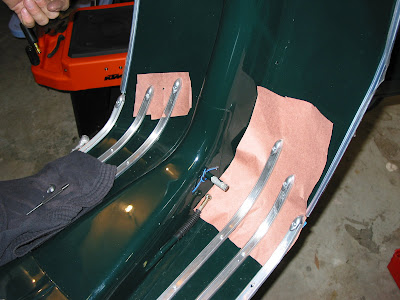
 Next we installed a very thick fibered paper that my wife bought when we painted out house. This stuff is tough! You could drag a wrench across it and your paint would be safe. Heck you could spill water on it and your scoot would stay dry. With a nail punch we marked the holes.
 Then we shaped all three of the floor rails for the left side starting with the inner ones and ending with the outer pictured above. The first two were very easy.
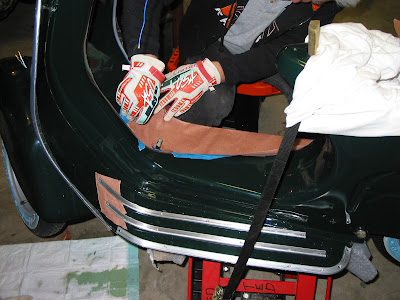
 The outer rail was a little tricky. We wanted to make sure that the end cap holes lined up too. We used a camping propane bottle in a vice and put a sock over the rail and then gently rolled in a curved shape.
 We then mounted a wall hook to a piece of wood for leverage and put the outer rail back on the frame and rocked the hook in the rail to snug it up perfectly. It worked well without creasing the rail.
 After that we enlarged the rail holes to accept the pop rivets. Do not enlarge the end cap holes. That is not necessary.
 File the holes clean. It is important that the base of the floor rail is clean and clear. The inside needs to be clean too so you minimize the size of knob on the pop rivet. The rubber still needs to fit over top of it.
 We bolted the end caps on to hold the rail in place. We taped the washer to protect the paint.
 With the drill again we made sure all the holes were aligned. We moved the rail as far forward as possible so the end cap would rest beside for the legshield trim.
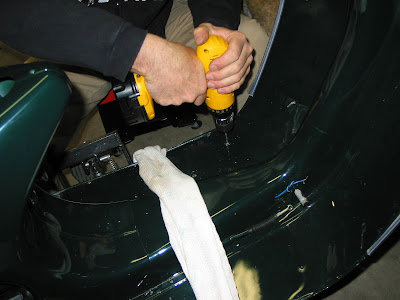
 Next we pop riveted the holes, but we did NOT tighten them all the way to cut free. We applied pressure to the floor rail as we pop riveted. Be very careful, because there is a danger you can crease and destroy your floor rails here. Do NOT over tighten. With the outer rail we were successful. Also, make sure you tuck the rivet head into the beading along the outside of the frame underneath so it lays flush when you compress the rivet.
 This is what the pop rivets look like before being cut. The flush side is underneath. I opted not to use washers for a cleaner look and it seems the install went well.
 We checked everything and then tightened them all down one click and crack no more pop rivet, just a rivet.
 The Rally kit is not a perfect match, but it's close. The body work was not flush and therefore we needed to move the rail a hair here and a hair there. We were very gently and the soft metal is very responsive.
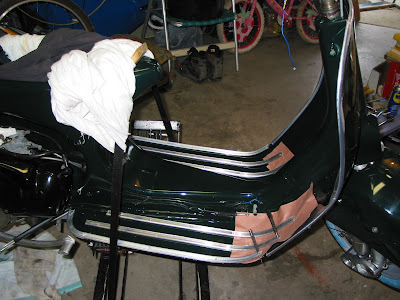
 This is how the outer rail looks installed.
 My biggest disappointment is that the end cap is not further up. I honestly expected it to be further up -- not perfect but better. I was warned these rails were thinner and shorter, but I didn't expect it to look this bad. The weird thing is that the Rally rails line up with the holes in the frame and the end caps holes obviously line with the rails; therefore I wonder if the P Series legshield trim is why it is coming up short. I need to look into that.
I will go with the Pascoli kit in the future, but for now I want to find an NOS legshield trim. Once I have the right trim I'll redo the floor rails. Look at Hiro's pictures (scroll down) and you'll see what I mean about how terribly my rails look to stock ones. I am upset about this, but too tired to go BBS on myself at the moment. CRAP! My wife, the owner and rider of this SS, is even considering if going with the correct floor rail kit is best. I am with her, but don't want to throw one on if the legshield trim is too short anyways.
Of course, the good news is this is stuff that can be changed later if needed, but will function okay in the interim. I worry the bike is turning into an Ugly Betty with these two items being so visible and off. The bike is SO close to 100% original, but these items lower it for me. I guess it will be up to Lisa, my wife, to make the final call.
I don't know if I am going to invest $40+ in Pascoli VSC floor rail rubber if I may just replace the hole kit later on and if the Rally rails are shorter I will NOT be able to use the VSC rubber again, because it will be cut short.
Doesn't it suck that I had to have it fully installed to see how bad it looked. I can't return it now and I am unsure if I will just quit and order Pascoli or if I will install these and hunt for NOS and when I find hope to buy for under $300 for the legshield beading and the floor rail. We'll have to see. I am researching that right now.
 The end caps will be hand peened. Lucky for me Ted has experience. His resume is pretty extensive for working on cars and motorcycles. His training came in the late 60s and 70s. If you ever research body work you'll most likely be steered to a 1970 vo-tech manual on "moving metal." During those times it was still an art, not just replace a fiberglass part like today. Pictured above is Ted and the aluminum bowl he hand peened from a plat piece of metal with a sand back for his mom in 1968.
--------- Day 2 ----------
This process is moving so much slower than I expected. The work can be pretty frustrating, because of the required angles for the floor rails.
We spent another solid 4 plus hours (with two people working) and all that was done was two more floor rails were added (inner ones) and I sanded and polished all of the end caps. So half of the job was complete.
 For polishing, I used a file and file down the knob (poor casting quality) until it was almost flush. Then I used 2000 grit wetodry sand paper and ONLY sanded the area I filed so as not to screw the polish up on the rest of the end cap. Then I polished it with Mother's. It cleaned up nice. When I install I will hide the blemished sides facing the bike so people won't see it; though it's not noticable unless you look for it.
-------- Day 3 ---------
 Again we used the ultra thick paper to protect the paint from the rails.
 It felt good to see both rails in place.
 With a heavy anchor and a punch Ted and I flattened one of the pop rivet heads in the rail so we could run the rubber through smoothly. The aluminum pop rivets give way easily.
 The hardest rail to line up is the outer. We had use a rubber mallet on the back of the outer rail on this side to get it to line up in the grove correctly; fortunately this metal is super soft and doesn't take much at all.
We're hunting for the correct rivet punches and waffle.
When all was said and done it looked like this.

First we cut the tip off the punch and then using a Dremel and a concave drill bit we shaped the tip.

We added oil as we drilled it out, which helped a lot.

Then we used a softer Dremel tip to "cone" it out.

Once done we used Emery paper to smooth it out. The finish product was pretty good considering we don't have shop lathe, which would have made this process a lot faster and easier.

We also used screws, washers (with painters tape), and nuts to bolt on the end caps so in the hopes that the floor rails would retain a memory of shape.
We very quickly learned that the majority of the holes of the end caps do not line up with the floor rails and frame holes, which means the rivets or screws are angled. This upset us. It was a major paint in the butt to bolt them down and most of the endcaps did not fit, they are cockeyed.
Before screwing the endcaps on I carefully selected each endcap for each specific rail and numbered them with a Sharpie on the rail and endcap so as not to mix them up. My goal was to hide the area where I filed and sanded the endcap mold down.
--------- Day 5 ---------
This day sucked. It was a 7 hour day and we have nothing to show for it other than a few tools. Hand peening the rivets went terrible.
We used a bolt to create the ancho that will rest on top of the rivet while it is hit from the bottom. We created 2-3 of these concave punches in all.
First we use a pointed punch to mark the center of it.

Then we used a drill to concave the tip.

Next we decided to make the waffle. Using another Harbor Freight punch from my packet we hack-sawed it so the diameter was as big as possible. We then hack-sawed three cuts in it in each direction being careful to also angle the saw so as to create the teeth of the waffle.

We cleaned the waffle up with the Dremel.

But we found that best thing to use was an angled file.
 I recommend using the file to create the groove instead of the hack-saw or Dremel.
 I am not happy with how sharp the teeth are on the waffle. I need to re-do it.
We then spent hours working on hand peening the rivets. We put the rivets through the end caps and then cut the excess at 1/4 inch. It leaves a little mohawk shape. Then we used the concave punch, but the rivet kept bending and folding over. It was terrible. We used a concave anchor on top of the rivet to protect the the rivet. We use a rubber with adhesive -- we cut a hole in it -- to protect the paint. It worked, but made it too hard to see so we used painter's tape. We tried a couple times and ended up with the punch eating into the paint. CRAP! We started to install the rear most inner end cap, so it is the least likely to be seen. We laid the bike at an angle -- resting the motor on a block of wood.
We drilled out the rivets after being so bummed with the outcome of the rivet. Check out the May 3rd post on how to properly ball peen rivets. I found it to be very helpful.
Feeling frustrated and defeated we quit. I called Mic at Scooter Shop for advice. He told me two bits of advice: (1) we have too much length on our rivets and need to cut them shorter and (2) use a ball peen hammer to steer the rivet as it is hammered down. The stock rivets from the manufacturer are not perfect looking either. They are bent angles to and somewhat folded over itself, like a compressed slinky that slowly folds into a mushroom. Then it is waffled flat.
We'll try again. We have at least 20 hours invested in the floor rail kit so far and it is a major pain in the butt, but we won't quit until we get it right.
The only problem is my painter wants the bike ASAP to do the touch up because I move back West with the bike on June 9th.
I recently was told by a reputable shop that Pascoli is now outsourcing his products and the quality of them is a lot different that it was four or five years ago. I do not have first hand knowledge of this, but it makes me slower to want to buy Pascoli immediately.
If I replaced my legshield trim with Pascoli's ($67) and my floor rail kit ($170) my bike would be more period correct -- totaling $237 plus shipping. I spent under $70 with shipping for my set up, which other SS180 owners have used. So for a grand total of $307 plus shipping we can have it correct (with our $70 already invested). The question is would we see a return on this investment if we sold the bike. Is it like a new kitchen or bathroom where your guaranteed a return? Is it important enough to the owner Lisa to have it period correct? This is a moot point considering we don't have $300 to spend right now. We have some huge expenses coming and it will be a long while before the toy penny bank starts filling up. We will roll with what we have and some time down the road I will fix the seat and replace these items.
This blog post will comprehensively cover one way to install floor rails. After five or more hours of phone calls, web searching, emails, and two web forums I decided to pop rivet everything, but the end caps on the floor rail kit. The end caps will be hand peened into a mushroom and then waffled to look manufacturer stock.
Day one:
After three hours work we had one outer rail pop riveted on and all three left side floor rails shaped and the holes cleaned out and lined up. We spent 45 minutes planning and discussing our plan of attack. We learned a lot and the rest should go much faster.
I will add to this entry until it is complete. Please re-visit as it is incomplete in this state.
 In retrospect, I wish I bought the $170 Pascoli VSC floor rail kit instead of the $47 Rally kit. We'll get into that later. Pictured above is the Rally kit made by Olympia (Italian).
 Here you can see the original rails beside my brand new ones. A rough measurement showed them to be very close in length and shape. The Olympia kit is probably over an inch shorter -- at least on the outer rails. I have heard that CIF brand is longer and would be better to use, but I do not have first hand knowledge of this.
 The end caps of the Olympia kit are on the right and left is stock.
 At a closer look you can see the mold the new end caps came from left a knob. I will use Wetodry sandpaper to sand that off. I bought a variety pack and will hit will 2000 grit wet paper. Then I will make sure those end caps face inward so no one sees that I sanded them.
 Ted owned a pop rivet gun and last week we determined the pop rivet size required. I will post later. If you click to enlarge the photo you can read the sizes he bought. We used the larger.
 We cleaned out the paint from the holes in the frame to make sure they would accept the rivets.
 Run a small pilot through all holes and then a larger drill bit for all holes, but NOT the end caps, because the rivet is smaller.
 Do not wipe the drill shavings off with a cloth. You'll kill your paint. Blow it off.
 Next we installed a very thick fibered paper that my wife bought when we painted out house. This stuff is tough! You could drag a wrench across it and your paint would be safe. Heck you could spill water on it and your scoot would stay dry. With a nail punch we marked the holes.
 Then we shaped all three of the floor rails for the left side starting with the inner ones and ending with the outer pictured above. The first two were very easy.
 The outer rail was a little tricky. We wanted to make sure that the end cap holes lined up too. We used a camping propane bottle in a vice and put a sock over the rail and then gently rolled in a curved shape.
 We then mounted a wall hook to a piece of wood for leverage and put the outer rail back on the frame and rocked the hook in the rail to snug it up perfectly. It worked well without creasing the rail.
 After that we enlarged the rail holes to accept the pop rivets. Do not enlarge the end cap holes. That is not necessary.
 File the holes clean. It is important that the base of the floor rail is clean and clear. The inside needs to be clean too so you minimize the size of knob on the pop rivet. The rubber still needs to fit over top of it.
 We bolted the end caps on to hold the rail in place. We taped the washer to protect the paint.
 With the drill again we made sure all the holes were aligned. We moved the rail as far forward as possible so the end cap would rest beside for the legshield trim.
 Next we pop riveted the holes, but we did NOT tighten them all the way to cut free. We applied pressure to the floor rail as we pop riveted. Be very careful, because there is a danger you can crease and destroy your floor rails here. Do NOT over tighten. With the outer rail we were successful. Also, make sure you tuck the rivet head into the beading along the outside of the frame underneath so it lays flush when you compress the rivet.
 This is what the pop rivets look like before being cut. The flush side is underneath. I opted not to use washers for a cleaner look and it seems the install went well.
 We checked everything and then tightened them all down one click and crack no more pop rivet, just a rivet.
 The Rally kit is not a perfect match, but it's close. The body work was not flush and therefore we needed to move the rail a hair here and a hair there. We were very gently and the soft metal is very responsive.
 This is how the outer rail looks installed.
 My biggest disappointment is that the end cap is not further up. I honestly expected it to be further up -- not perfect but better. I was warned these rails were thinner and shorter, but I didn't expect it to look this bad. The weird thing is that the Rally rails line up with the holes in the frame and the end caps holes obviously line with the rails; therefore I wonder if the P Series legshield trim is why it is coming up short. I need to look into that.
I will go with the Pascoli kit in the future, but for now I want to find an NOS legshield trim. Once I have the right trim I'll redo the floor rails. Look at Hiro's pictures (scroll down) and you'll see what I mean about how terribly my rails look to stock ones. I am upset about this, but too tired to go BBS on myself at the moment. CRAP! My wife, the owner and rider of this SS, is even considering if going with the correct floor rail kit is best. I am with her, but don't want to throw one on if the legshield trim is too short anyways.
Of course, the good news is this is stuff that can be changed later if needed, but will function okay in the interim. I worry the bike is turning into an Ugly Betty with these two items being so visible and off. The bike is SO close to 100% original, but these items lower it for me. I guess it will be up to Lisa, my wife, to make the final call.
I don't know if I am going to invest $40+ in Pascoli VSC floor rail rubber if I may just replace the hole kit later on and if the Rally rails are shorter I will NOT be able to use the VSC rubber again, because it will be cut short.
Doesn't it suck that I had to have it fully installed to see how bad it looked. I can't return it now and I am unsure if I will just quit and order Pascoli or if I will install these and hunt for NOS and when I find hope to buy for under $300 for the legshield beading and the floor rail. We'll have to see. I am researching that right now.
 The end caps will be hand peened. Lucky for me Ted has experience. His resume is pretty extensive for working on cars and motorcycles. His training came in the late 60s and 70s. If you ever research body work you'll most likely be steered to a 1970 vo-tech manual on "moving metal." During those times it was still an art, not just replace a fiberglass part like today. Pictured above is Ted and the aluminum bowl he hand peened from a plat piece of metal with a sand back for his mom in 1968.
--------- Day 2 ----------
This process is moving so much slower than I expected. The work can be pretty frustrating, because of the required angles for the floor rails.
We spent another solid 4 plus hours (with two people working) and all that was done was two more floor rails were added (inner ones) and I sanded and polished all of the end caps. So half of the job was complete.
 For polishing, I used a file and file down the knob (poor casting quality) until it was almost flush. Then I used 2000 grit wetodry sand paper and ONLY sanded the area I filed so as not to screw the polish up on the rest of the end cap. Then I polished it with Mother's. It cleaned up nice. When I install I will hide the blemished sides facing the bike so people won't see it; though it's not noticable unless you look for it.
-------- Day 3 ---------
On the third day we repeated all of the steps described above on the right floor rails. The holes lined up a little better between the rails and frame.
We made sure line up all the end caps with the rails before laying them down.
Make sure when you drill out the frame holes that you drill from bottom up, because the drill bit will tear the paint and that can be hidden beneath a rail very easily, but not as easily beneath a rivet. Ted thought it wouldn't be an issue, but it was for the most visible holes (the front end caps) on this side and now we need to make sure that the mushroom rivet head will cover it -- it should.
 Again we used the ultra thick paper to protect the paint from the rails.
 It felt good to see both rails in place.
 With a heavy anchor and a punch Ted and I flattened one of the pop rivet heads in the rail so we could run the rubber through smoothly. The aluminum pop rivets give way easily.
 The hardest rail to line up is the outer. We had use a rubber mallet on the back of the outer rail on this side to get it to line up in the grove correctly; fortunately this metal is super soft and doesn't take much at all.
Make sure that the body is going to line up with the rail before paint. I'd give the body shop person the bike with the rails bolted on personally so he/she could see how it should line up. I have tiny gaps that I need to hide by moving the floor rail metal very slightly.
Here's what we have left:
1) Flatten the pop rivet heads so the rubber will fit properly
2) Install rubber
3) Install the end caps / rivets
4) Waffle the end cap rivets
We're hunting for the correct rivet punches and waffle.
For newbies, working in a pair slowly and cautiously give yourself 10 hours to do the entire job well.
-------- Day 4 ---------
I spent $1.69 at Harbor Freight Tools for these punches and decided to use these to create my rivet punches.

When all was said and done it looked like this.

First we cut the tip off the punch and then using a Dremel and a concave drill bit we shaped the tip.

We added oil as we drilled it out, which helped a lot.

Then we used a softer Dremel tip to "cone" it out.

Once done we used Emery paper to smooth it out. The finish product was pretty good considering we don't have shop lathe, which would have made this process a lot faster and easier.

We also used screws, washers (with painters tape), and nuts to bolt on the end caps so in the hopes that the floor rails would retain a memory of shape.

We very quickly learned that the majority of the holes of the end caps do not line up with the floor rails and frame holes, which means the rivets or screws are angled. This upset us. It was a major paint in the butt to bolt them down and most of the endcaps did not fit, they are cockeyed.
Before screwing the endcaps on I carefully selected each endcap for each specific rail and numbered them with a Sharpie on the rail and endcap so as not to mix them up. My goal was to hide the area where I filed and sanded the endcap mold down.
--------- Day 5 ---------
This day sucked. It was a 7 hour day and we have nothing to show for it other than a few tools. Hand peening the rivets went terrible.
We used a bolt to create the ancho that will rest on top of the rivet while it is hit from the bottom. We created 2-3 of these concave punches in all.
First we use a pointed punch to mark the center of it.

Then we used a drill to concave the tip.

Next we decided to make the waffle. Using another Harbor Freight punch from my packet we hack-sawed it so the diameter was as big as possible. We then hack-sawed three cuts in it in each direction being careful to also angle the saw so as to create the teeth of the waffle.

We cleaned the waffle up with the Dremel.

But we found that best thing to use was an angled file.
 I recommend using the file to create the groove instead of the hack-saw or Dremel.
 I am not happy with how sharp the teeth are on the waffle. I need to re-do it.
We then spent hours working on hand peening the rivets. We put the rivets through the end caps and then cut the excess at 1/4 inch. It leaves a little mohawk shape. Then we used the concave punch, but the rivet kept bending and folding over. It was terrible. We used a concave anchor on top of the rivet to protect the the rivet. We use a rubber with adhesive -- we cut a hole in it -- to protect the paint. It worked, but made it too hard to see so we used painter's tape. We tried a couple times and ended up with the punch eating into the paint. CRAP! We started to install the rear most inner end cap, so it is the least likely to be seen. We laid the bike at an angle -- resting the motor on a block of wood.
We drilled out the rivets after being so bummed with the outcome of the rivet. Check out the May 3rd post on how to properly ball peen rivets. I found it to be very helpful.
Feeling frustrated and defeated we quit. I called Mic at Scooter Shop for advice. He told me two bits of advice: (1) we have too much length on our rivets and need to cut them shorter and (2) use a ball peen hammer to steer the rivet as it is hammered down. The stock rivets from the manufacturer are not perfect looking either. They are bent angles to and somewhat folded over itself, like a compressed slinky that slowly folds into a mushroom. Then it is waffled flat.
We'll try again. We have at least 20 hours invested in the floor rail kit so far and it is a major pain in the butt, but we won't quit until we get it right.
The only problem is my painter wants the bike ASAP to do the touch up because I move back West with the bike on June 9th.
-------- More to follow ---------
Tuesday, 1 April 2008
Resource: Floor rail & rivets
If I was a pro I could hand peen the rivets on my floor rail kit to look 100% in 20 hours. The question is, what other options/methods are out there that would be balanced for looking stock?
Some SS180 owners complain that the Rally kits, especially the outer rails, are too short and are not wide enough to look stock. I've learned that the Italian company CIF makes the Rally kits nearly 100% the same as the SS kits were minus the the floor rail rubber, which can easily be changed out. Something to think about.
I also bought an Italian brand -- Olympia. I am not sure if it is the same length as my beater stock ones are. I'll get back to you on that and I may opt to replace the rubber, dependent on my wife. I am also going to see if I can polish up and reuse my original end caps.
Another thing to think about . . . look at the Tecnica pictures on this blog. Note that the tips of the legshield chrome are cut perfectly for the floor rail end caps to fit into. I am using the P Series trim and will see if I can replicate that.
This blog post is a collection of everything I am learning . . . I will add more as I learn more.
---------- From Collin ---------
Hi Jeremy,
Call Mic and ask him for the "good" rubber for SS180/Rally kits. The Rubber included in the kit is pretty good, and definitely does the job fine, but over time is prone to shrinking and yes, is slightly less wide than original rubber. Scootershop sells the other kind of rubber seperately, if needed ( I forget where Mic gets it..it might be Mauro Pascoli).
For all Vespas, including my SS Hurricane, and other $10,000+ scooters, I don't follow factory original "to a T"..it's a waste of time. The originals were all peened on with a waffle-texture flat mallet, which I don't have...and it's a minute detail for anoraks and museum types (ie...it doesn't really matter).
Use a hand operated rivet gun (available for $20 at Home Depot), and use aircraft style pop-rivets for all holes except for the endcaps. Use the peen type "smash" rivets for the endcaps front and rear of each strip. That way, with the rubber on, all you see is peen type rivets from the top of the endcaps, and seen at the front of the scooter under the legshield, and it looks right.
Here's the rundown:
1) Lay LOTS of masking tape around the floorboard where the strips are going down. It's a lot easier to cut/remove tape afterwards than repair scratches.
2) prebend all strips to match the curve of the frame
3) use pop rivets and rivet gun to lay down all 6 strips using CENTER holes only ( no endcaps).
4). Do the 6 rear endcaps first- peen style rivets. Put a Rivet through the endcap and insert into the end of the strip and frame hole. Cut the extra part of the rivet away leaving about 1/8" sticking through the hole. Then, take a nice heavy punch (with a fine tip the size of the rivet head), and cover it in multiple layers of masking take, this will keep the rivet head looking good. Hold the punch against the top of the rivet head/endcap pushing it into the frame, with your left hand. Then, taking a light hammer, tap at the bit of rivet sticking out the other side of the frame with your other hand. Apply pressure with the left hand punch so that the endcap is close as possible to the frame. Tap lightly and frequently...the rivet is soft aluminum, and will begin to "flatten out" wider than the hole, which will hold the endcap in place.
Doing the 6 rear ones will give you practice for the more critical 6 front ones (that are visible).
5) Repeat procedure #4 to the front 6 rivets, but put masking tape down covering the holes in the frame, before you put the rivet through it. Keep the tape there while you hammer the rivet in place. This will protect the paint while you hammer, in case it cracks the paint, or you miss the rivet!
6) now that the rails and endcaps are all there and tight, start putting the rubber in. Start at one end, tuck a bit of it under one of the floor rails, and work the rubber in side-to-side (or with careful aid of a small flat screwdriver). when you get to the other endcap, leave about an extra 1/4" of rubber (for future shrinking protection), and cut it off from the bulk of rubber. Tuck the other end under endcap #2, and work it all in place. Repeat for all 6 rails.
Hope that helps!
Cheers,
-Collin
--------- From Mic at Scooter Shop --------
I spent 20 minutes on the phone with Mic last night as he walked me through the process he uses. Bottom line is there are about four different ways to approach installing floor rail kits. We covered only three. The anoraks (purist) hire Mic to install their floor rails “correctly” by hand peening each rivet.
Mic has been doing this for 20 years now and is quite fast. It takes him about 20 hours and he charges about $500 for the installation of the floor rail.
A nice middle ground between the anorak approach and actually just bolting on the floor rails (as some do) is to hand peen just the end caps because those are the visible items (unless an anorak gets on his back and slides under your Vespa at a rally and chews you a new one for fully destroying your scooter and then goes online and flames you for life).
First off, it’s easiest if you drop the motor out.
1) The way to do is to first use a Dremel and with a small bit clean out the holes of paint and such. Dry install your floor rails and line up the holes in the frame to your floor rails. You may need to drill new holes in the floor rail. Do NOT drill them in your frame.
2) Then pop rivet, with a hand rivet tool, the centers of the floor rails (everything that goes under the rubber), but leave the end caps alone. Do not tighten the pop rivets all the way down yet. If you do you run the risk of over tightening one and denting/creasing the floor rail. Once they are all installed, tighten them all the way.
3) Now that pop rivets are in place you will run you rubber into place. The end caps are next and will take you about 5-8 hours to do. First, find an old busted up Vespa frame and practice practice practice hand peening rivets. Once you are a pro . . .
4) Time to cut the rivets to the correct length. Push the rivets down into place. Duck tape the tops of them to hold them in place. Using flat dikes pull down on the rivet from beneath the frame. Once it will not go any further cut the length to a ¼ visible beneath the frame using snips.
5) Lay the bike on its side. With a heavy weight hold the top of the rivet in place. Using duck tape or by drilling a hole in a thick refrigerator magnet protect the paint around the rivet. You will miss at some point. Protect your paint! Begin hand peening the bottom. Hit the rivet with a ball peen hammer so insanely soft that it takes what feels like eternity. Start with the end caps at the back of the bike. They are less visible, so if you mess up it’s not as bad.
6) The end cap rivets look like a “mushroom” now. Look for a file that has a waffle-like pattern on it. Mic had three special ones made of different sizes for his shop. With another person holding the file give a medium wack to the rivet mushrooms beneath the end caps and you will have a pretty stock looking floor rail job. Mic has seen the air chisel approach and it looks pretty good he said (not stock though), but he thinks the hand rivet tool does just as good as a job (if not better) and is NOT as risky for screwing up the paint job on a bike.
--------- From Tom G. --------
Not sure what you mean by a hand rivet tool. I sometimes use pop rivets for the non-end-cap parts
of floorrails, but only for non-"restorations." When I'm trying to be correct, I hand-peen the rivets, but
even then, my method is not 100% factory correct. (pretty good though).
The tiny flat-head rivets for attaching the middle part of the floor rails can be sourced from a variety
of places (but not any scooter shops as far as I know). Maryland Metrics is one option. I think the
correct reference is DIN standard 661 for these, but you need to confirm that (and the diameter). I
haven't ordered any in a while. You poke them through the rail and floor, hold them down from the top with a
heavy bucking bar, cut to length from under the scooter (leaving about 3/16" to 5/16" protruding
depending on the peening method you choose), and then peen the cut end to mushroom it. The peening is where
the art comes in though. If you just hit the cut end with a hammer, it will smash flat -- which works fine,
but does not look quite correct. If you use the air chisel technique WITH THE RIGHT FITTINGS, you can get
a look that is closer to original -- but it takes some trial and error to get the look and fit right, and
there are risks. It is harder to control an air chisel, and it may slip and damage your paint. Also,
if your floor has bondo or filler in it, you may loosen it up, or crack the paint, etc. OR if your air
setting is too high, the chisel gives a pretty good smack to the rivet, and the force can be transmitted
to the floor, actually dimpling it up under the end cap (and cracking your paint). So . . . you might
consider hand peening your rivets. If you take a brass drift at least 3 dimes the diameter of your
rivet end, and drill a 1/8" hole in one end (just slightly larger than the diameter of the rivet), you
can use that hole to keep the drift centered on the rivet while you tap the other end of the drift with a
hammer. Again, you risk slipping and damaging your paint, but the drift method does cause the rivet to
plump along its entire length instead of just flattening at the end. In order to get this to work,
of course you have to keep a lot of pressure on the bucking bar that holds the head of the rivet in place.
This is a two-person job. Anyway, I assume you've already read up on this subject, so I'll stop now.
In any case, you should use my patented refrigerator magnet technique to protect your paint when peening
rivet heads. You know it?
Tom G.
---------- From Hiro (Palmog) --------
Hello Jeremy,
everything is going well?
I only use the original rails and my rails are fixed with nuts and bolts so I've not experienced this. However, I did research during my restoration and here are some tips.
Bending rails: I guess vinyl tape would help to protect your paint from scratch but do not try to bend your rails on the paint surface. Only check if the curve will match together.
Reveting: you will need correct tools and some practice.
Please find attached photos of my reveting tools purchased from Italy years ago. To smash the head of the revets, I would say it is better to use revet gun (pneumatic riveter in English??), for example, old Avdel revet gun seems to work fine.
I didn't find the page described in English but here is a link originally written in Japanese and translated using Babelfish.
http://tinyurl.com/2waop2
Use proper air tool to smash it!
Hope this helps,
-Hiro
-------- From Josh at BBS --------
Search the BBS.
http://www.scooterbbs.com/bbs/dcboard.php?az=show_topic&forum=10&topic_id=316305
Some SS180 owners complain that the Rally kits, especially the outer rails, are too short and are not wide enough to look stock. I've learned that the Italian company CIF makes the Rally kits nearly 100% the same as the SS kits were minus the the floor rail rubber, which can easily be changed out. Something to think about.
I also bought an Italian brand -- Olympia. I am not sure if it is the same length as my beater stock ones are. I'll get back to you on that and I may opt to replace the rubber, dependent on my wife. I am also going to see if I can polish up and reuse my original end caps.
Another thing to think about . . . look at the Tecnica pictures on this blog. Note that the tips of the legshield chrome are cut perfectly for the floor rail end caps to fit into. I am using the P Series trim and will see if I can replicate that.
This blog post is a collection of everything I am learning . . . I will add more as I learn more.
---------- From Collin ---------
Hi Jeremy,
Call Mic and ask him for the "good" rubber for SS180/Rally kits. The Rubber included in the kit is pretty good, and definitely does the job fine, but over time is prone to shrinking and yes, is slightly less wide than original rubber. Scootershop sells the other kind of rubber seperately, if needed ( I forget where Mic gets it..it might be Mauro Pascoli).
For all Vespas, including my SS Hurricane, and other $10,000+ scooters, I don't follow factory original "to a T"..it's a waste of time. The originals were all peened on with a waffle-texture flat mallet, which I don't have...and it's a minute detail for anoraks and museum types (ie...it doesn't really matter).
Use a hand operated rivet gun (available for $20 at Home Depot), and use aircraft style pop-rivets for all holes except for the endcaps. Use the peen type "smash" rivets for the endcaps front and rear of each strip. That way, with the rubber on, all you see is peen type rivets from the top of the endcaps, and seen at the front of the scooter under the legshield, and it looks right.
Here's the rundown:
1) Lay LOTS of masking tape around the floorboard where the strips are going down. It's a lot easier to cut/remove tape afterwards than repair scratches.
2) prebend all strips to match the curve of the frame
3) use pop rivets and rivet gun to lay down all 6 strips using CENTER holes only ( no endcaps).
4). Do the 6 rear endcaps first- peen style rivets. Put a Rivet through the endcap and insert into the end of the strip and frame hole. Cut the extra part of the rivet away leaving about 1/8" sticking through the hole. Then, take a nice heavy punch (with a fine tip the size of the rivet head), and cover it in multiple layers of masking take, this will keep the rivet head looking good. Hold the punch against the top of the rivet head/endcap pushing it into the frame, with your left hand. Then, taking a light hammer, tap at the bit of rivet sticking out the other side of the frame with your other hand. Apply pressure with the left hand punch so that the endcap is close as possible to the frame. Tap lightly and frequently...the rivet is soft aluminum, and will begin to "flatten out" wider than the hole, which will hold the endcap in place.
Doing the 6 rear ones will give you practice for the more critical 6 front ones (that are visible).
5) Repeat procedure #4 to the front 6 rivets, but put masking tape down covering the holes in the frame, before you put the rivet through it. Keep the tape there while you hammer the rivet in place. This will protect the paint while you hammer, in case it cracks the paint, or you miss the rivet!
6) now that the rails and endcaps are all there and tight, start putting the rubber in. Start at one end, tuck a bit of it under one of the floor rails, and work the rubber in side-to-side (or with careful aid of a small flat screwdriver). when you get to the other endcap, leave about an extra 1/4" of rubber (for future shrinking protection), and cut it off from the bulk of rubber. Tuck the other end under endcap #2, and work it all in place. Repeat for all 6 rails.
Hope that helps!
Cheers,
-Collin
--------- From Mic at Scooter Shop --------
I spent 20 minutes on the phone with Mic last night as he walked me through the process he uses. Bottom line is there are about four different ways to approach installing floor rail kits. We covered only three. The anoraks (purist) hire Mic to install their floor rails “correctly” by hand peening each rivet.
Mic has been doing this for 20 years now and is quite fast. It takes him about 20 hours and he charges about $500 for the installation of the floor rail.
A nice middle ground between the anorak approach and actually just bolting on the floor rails (as some do) is to hand peen just the end caps because those are the visible items (unless an anorak gets on his back and slides under your Vespa at a rally and chews you a new one for fully destroying your scooter and then goes online and flames you for life).
First off, it’s easiest if you drop the motor out.
1) The way to do is to first use a Dremel and with a small bit clean out the holes of paint and such. Dry install your floor rails and line up the holes in the frame to your floor rails. You may need to drill new holes in the floor rail. Do NOT drill them in your frame.
2) Then pop rivet, with a hand rivet tool, the centers of the floor rails (everything that goes under the rubber), but leave the end caps alone. Do not tighten the pop rivets all the way down yet. If you do you run the risk of over tightening one and denting/creasing the floor rail. Once they are all installed, tighten them all the way.
3) Now that pop rivets are in place you will run you rubber into place. The end caps are next and will take you about 5-8 hours to do. First, find an old busted up Vespa frame and practice practice practice hand peening rivets. Once you are a pro . . .
4) Time to cut the rivets to the correct length. Push the rivets down into place. Duck tape the tops of them to hold them in place. Using flat dikes pull down on the rivet from beneath the frame. Once it will not go any further cut the length to a ¼ visible beneath the frame using snips.
5) Lay the bike on its side. With a heavy weight hold the top of the rivet in place. Using duck tape or by drilling a hole in a thick refrigerator magnet protect the paint around the rivet. You will miss at some point. Protect your paint! Begin hand peening the bottom. Hit the rivet with a ball peen hammer so insanely soft that it takes what feels like eternity. Start with the end caps at the back of the bike. They are less visible, so if you mess up it’s not as bad.
6) The end cap rivets look like a “mushroom” now. Look for a file that has a waffle-like pattern on it. Mic had three special ones made of different sizes for his shop. With another person holding the file give a medium wack to the rivet mushrooms beneath the end caps and you will have a pretty stock looking floor rail job. Mic has seen the air chisel approach and it looks pretty good he said (not stock though), but he thinks the hand rivet tool does just as good as a job (if not better) and is NOT as risky for screwing up the paint job on a bike.
--------- From Tom G. --------
Not sure what you mean by a hand rivet tool. I sometimes use pop rivets for the non-end-cap parts
of floorrails, but only for non-"restorations." When I'm trying to be correct, I hand-peen the rivets, but
even then, my method is not 100% factory correct. (pretty good though).
The tiny flat-head rivets for attaching the middle part of the floor rails can be sourced from a variety
of places (but not any scooter shops as far as I know). Maryland Metrics is one option. I think the
correct reference is DIN standard 661 for these, but you need to confirm that (and the diameter). I
haven't ordered any in a while. You poke them through the rail and floor, hold them down from the top with a
heavy bucking bar, cut to length from under the scooter (leaving about 3/16" to 5/16" protruding
depending on the peening method you choose), and then peen the cut end to mushroom it. The peening is where
the art comes in though. If you just hit the cut end with a hammer, it will smash flat -- which works fine,
but does not look quite correct. If you use the air chisel technique WITH THE RIGHT FITTINGS, you can get
a look that is closer to original -- but it takes some trial and error to get the look and fit right, and
there are risks. It is harder to control an air chisel, and it may slip and damage your paint. Also,
if your floor has bondo or filler in it, you may loosen it up, or crack the paint, etc. OR if your air
setting is too high, the chisel gives a pretty good smack to the rivet, and the force can be transmitted
to the floor, actually dimpling it up under the end cap (and cracking your paint). So . . . you might
consider hand peening your rivets. If you take a brass drift at least 3 dimes the diameter of your
rivet end, and drill a 1/8" hole in one end (just slightly larger than the diameter of the rivet), you
can use that hole to keep the drift centered on the rivet while you tap the other end of the drift with a
hammer. Again, you risk slipping and damaging your paint, but the drift method does cause the rivet to
plump along its entire length instead of just flattening at the end. In order to get this to work,
of course you have to keep a lot of pressure on the bucking bar that holds the head of the rivet in place.
This is a two-person job. Anyway, I assume you've already read up on this subject, so I'll stop now.
In any case, you should use my patented refrigerator magnet technique to protect your paint when peening
rivet heads. You know it?
Tom G.
---------- From Hiro (Palmog) --------
Hello Jeremy,
everything is going well?
I only use the original rails and my rails are fixed with nuts and bolts so I've not experienced this. However, I did research during my restoration and here are some tips.
Bending rails: I guess vinyl tape would help to protect your paint from scratch but do not try to bend your rails on the paint surface. Only check if the curve will match together.
Reveting: you will need correct tools and some practice.
Please find attached photos of my reveting tools purchased from Italy years ago. To smash the head of the revets, I would say it is better to use revet gun (pneumatic riveter in English??), for example, old Avdel revet gun seems to work fine.
I didn't find the page described in English but here is a link originally written in Japanese and translated using Babelfish.
http://tinyurl.com/2waop2
Use proper air tool to smash it!
Hope this helps,
-Hiro


-------- Steve from Motor Sport Scooter --------
Just got off the phone with Steve. He is a fan of hand peening the end cap rivets and using pop rivets beneath the floor rail rubber.
Two things I learned are: (1) Make sure to use Peen Over Rivets (have a nice little button top) for going through the floor rail end caps and (2) if you are not using your stock or NOS floor rail kit fill the holes on your bike. The Rally rails are two small; therefore I will have VISIBLE holes above the end caps on the underside of the frame. THIS SUCKS!!!! Learn from my mistakes. (3) Before you paint buy your floor rail kit and get molded correctly and define if you need to fill any holes in the frame. Measure where your legshield trim will end and work from there. Your end cap will fit in the cut sleeve on the chrome legshield trim tips. If it's short it will be noticeable.-------- From Josh at BBS --------
Use the rivets supplied with the kit only in the end caps. You will most likely need to cut them down as well. I put them in thru the end cap and onto the floor board and then snip off usually about 1/2 of what is sticking thru..you only need about 1/3" or so protruding to work with. Place a dolly or block on top of the rivet, and gently peen the bottom of the rivet until it mushrooms out and tightens up.
I use the "Jim Williams" hatch marked punch to make it look right...take a punch, grind the tip flat to about 1/2" and then file in hatch marks on it to replicate the factory marks...then give that a little tap into your mushroomed bottom of rivet to make hatch marks in it.
Use pop rivets for the others. Once the others are pop riveted, gently smash the bottoms with a ball peen hammer while holding a dolly or other firm "block" on the top of the rivet... looks correct once peened and is far easier than blind rivets.
I generally do the pop rivets first, then the rear end cap, then insert the rubber, then the front end cap last for each rail. You can put a little duct tape over your tools if you are worried about slipping up and jacking your paint..You can also put a little masking tape around the area that you are peening as well to protect it.
good luck
Cheers!
Josh
--------Christopher from BBS --------
-------- Jim Williams from BBS --------
Search the BBS.
http://www.scooterbbs.com/bbs/dcboard.php?az=show_topic&forum=10&topic_id=316305


Wednesday, 9 January 2008
Floor rail rubber is AVAILABLE
Hot off the press from my email:
Good afternoon,
The black rubber for the floor rail for your VSC is our code G2020 and it cost 15.00€.
Shipment cost for USA is 12.00€.
I can send you the parts by post.
The payment is by credit card.
For the payment I need those details of your credit card:
1. your name and surname 2. the 16 numbers in front of the credit card
3. the numbers behind the credit card (code CVV2)
4. the date of expiration
You can write me an e-mail or a fax (0039 0544 502079).
I' m waiting for a your answer.
Thanks,
Pascoli Mauro
Mauro Pascoli
Mauro Pascoli srl
Via Faentina 175/a - Centro MIR
48100 Fornace Zarattini - Ravenna,
C.F./P.IVA 01451600397
tel. 0544/502078 - fax. 0544/502079
NOTE: I will speak with Lisa and see if she wants a $50 brand new kit for the Rally or if she wants me to clean up the original kit and pay $30 for the rubber and $24 for the shipping. I need to keep in mind that this is Lisa's bike and the goal is for her to be happy with it and pleasing myself by not using any new parts. The reality is this bike will be a "babied" scoot that is "ridden" and used. This has never been a museum restoration. It has always been my wife's bike and lucky for me, she doesn't get hung up or give a crap what purists and others have to say about her bike. She tell them where to stick it. Me, on the hand, I am beating myself up over this, the holes in the cowl, and the seat. I hate mistakes. Please, as always, learn from my errors!
Tuesday, 1 January 2008
Rally floor rail kit install instructions
If you already have paint on your scoot and you're installing a new floor rail kit . . . Paul C. emailed me a great suggestion for not screwing up your paint and retrofitting the SS 180 with Rally 200 floor rails.
From Paul C. . . .
pascoli kit are the correct width ,the rally ones are a bit narrower and the rubber has less ribs in them,if youre carefull the rally kit can be fitted without paint damage (if youre carefull, ) cover the paint in gaffa tape and bolt them down to take shape leave them for a while , then use the kit rivits one at a time to replace the bolts, make a tool fron a punch and use a die grinder to make a small circular bowl in end then spend some time polishing the bowl to avoid leaving marks in the end cap rivits .hit the rivits gently 20-30 times to spread the heads, they will go eventuly,but dont wack them , two people make the job much easier, dont bolt them down as a final fit, it looks like you dont have the guts to hit youre new paint with a hammer, you could use skate board sex bolts at a push. good luck
THANX PAUL C.
Saturday, 15 December 2007
Floor rail installation guide
In the not too distant future I hope to be reassembling the Vespa and since I am so terrible at just sitting and twiddling my thumbs I have been researching on how to install the floor rail kits.
I posted my question on BBS and Self Preservation Society sent to me a "how to" post he had written with photos (copy and paste link into your browser):
http://www.scooterbbs.com/bbs/dcboard.php?az=printer_friendly&forum=10&topic_id=316305&mesg_id=316316
I then wrote mentor Tom G. and asked if he approved of this method and this is what Tom G. said:
Lesson Learned:
VSC owners -- the closest floor rail kit is for the Rally. Note: it is a bit short and maybe a dozen people tops in the USA will notice this so Rally is not a bad way to go. But make sure that you purchase the floor rail kit and shape it against your frame BEFORE it is painted or you run a high risk of messing your paint job up.
Again, sucks to me. Learn from my mistakes. I have to find a way to shape my floor rail (if I don't use originals) kit along my freshly painted bike. Not smart!
For more info search "floor rail" on the Vespa-Sport Yahoo Group. Good info in the archives.
I posted my question on BBS and Self Preservation Society sent to me a "how to" post he had written with photos (copy and paste link into your browser):
http://www.scooterbbs.com/bbs/dcboard.php?az=printer_friendly&forum=10&topic_id=316305&mesg_id=316316
I then wrote mentor Tom G. and asked if he approved of this method and this is what Tom G. said:
Yes. Very easy, but you need to practice a bit toAt this point I want to find out if my floor rails are reusable (I hope to just clean them up if they have tiny scratches and such) and if I can find replacement rubber for it. Maybe Claus Studio can produce the rubber?
make sure your tools and settings are correct. Also,
you need a quality air regulator to get the chisel to
slow down enough to control it - the cheapie
regulators don't work well.
I also wrote up a hand peening method on the BBS years
ago, and it has been posted on various restoration
sites. I recommend that you take a refrigerator
magnet and punch a hole in it. Place it around the
end of the rivet that sticks out of the body before
you start hammering. That way if your hammer slips
your paint is a little protected.
Tom
Lesson Learned:
VSC owners -- the closest floor rail kit is for the Rally. Note: it is a bit short and maybe a dozen people tops in the USA will notice this so Rally is not a bad way to go. But make sure that you purchase the floor rail kit and shape it against your frame BEFORE it is painted or you run a high risk of messing your paint job up.
Again, sucks to me. Learn from my mistakes. I have to find a way to shape my floor rail (if I don't use originals) kit along my freshly painted bike. Not smart!
For more info search "floor rail" on the Vespa-Sport Yahoo Group. Good info in the archives.
Subscribe to:
Posts (Atom)